Showing posts with label chipamp. Show all posts

27 July 2014

Gobo LM1875 Amplifier Kit

The sharp looking amplifier below is the Gobo Stereo Audio Amplifier from boxkedkitamps.com which is sold as DIY kit.  We have completed a review of the Gobo LM1875 stereo amplifier kit which is available on the main site.  The Gobo kit is a class-AB chip amplifier kit that uses the LM1875 IC. The LM1875 amplifier kit includes all the required parts and enclosure to build a complete stereo amplifier. 


Gobo LM1875 Stereo Amplifier Kit
Completed Gobo LM1875 Stereo Amplifier Kit


The kit comes with a very detailed step-by-step instructions that make it possible for a first time amp builder with only soldering skills to complete the kit.  The amplifier kit comes with good quality parts like audio-grade capacitors from Nichicon Muse, Panasonic and WIMA.  The linear power supply for the amplifier kit makes use of a audio-grade toroidal transformer from Antek.


LM1875 Amplifier PCB modules
Assembled LM1875 Amplifier PCB Modules

LM1875 Amplifier Kit
Assembly - Gobo LM1875 Amplifier Kit

The completed kit really looks great.  The enclosure of the LM1875 amplifier kit is made from translucent blue acrylic plastic.  The rounded sides of the enclosure are very precisely laser cut hinges that allow you to bend and fold the plastic over to form the enclosure.


Gobo LM1875 Amp Kit + NAD C516BEE + Fostex FE206E BLH Speakers
Gobo LM1875 Amp Kit + NAD C516BEE + Fostex FE206E BLH

Above, the finished Gobo LM1875 is matched up with a pair of Fostex FE206E back-loaded horn (BLH) speakers and a NAD C516BEE CD player.  The amplifier is very accurate and  neutral with strong and accurate bass response.  The midrange and top end response is extended and sounds natural and detailed with no coloration.  Coupled with sensitive single-driver loudspeaker systems the combination is very revealing of recordings.  For the full details of the DIY kit, see our review of the Gobo LM1875 stereo amplifier kit. 

More Chip Amp / Gainclone Amplifier Projects

12 November 2010

Oatley K272A Head Amp audioXpress Review

The December 2010 issue of audioXpress magazine includes a review of the $30AU Oatley Electronics K272A tube based Headphone Amplifier Kit.  Mark Houston completed a review of the Oatley Electronics K272 Headphone Amplifier Kit in August 2009 and since then many hobbyists have enjoyed this inexpensive audio kit.  The hybrid headphone amplifier kit uses 6418 sub-miniature vacuum tubes and a headphone driver integrated circuit (PT2308).  Adding appeal to the tube based kit is battery operation. 


Highlights from the audioXpress Reliable Review of the Oatley Electronics K272A Headphone Amp by Aren van Waarde.

"Oatley Electronics (www.oatleyelectronics.com), which sells electronic parts and used equipment in New South Wales (Australia), has launched a small range of audio kits based on tube technology.  My interest was raised by glowing reviews written by Mark Houston, ..."

 "My initial impression of the sound of the K272A: warm, pleasant, and detailed.  Organ music sounded great."

"... the K272A/Grado combination produced excellent sound: a fne bass (powerful and deep but not overblown), detailed mid-range, sweet top-end.  Tonal colors of string instruments and vocals of male and female soloists were naturally represented. Many small, previously unnoticed details of recordings were revealed."

"In direct A/B comparisons, the K272A sounded better than the G4OEP (3/08 aX, p. 36) and even slightly better than the Stor class A amplifier (6/03 aX, p. 30)."

"For the asking price of 30 Australian dollars, the K272A is an absolute bargain.  And it does not involve any dangerous voltages."

The full review of the Oatley Electronics K272A Headphone Amp is available as a direct download from audioXpress [PDF- 737kB].


Additional Oatley Electronics Audio Kit Information:

What's Playing: Clannad - Macalla

05 September 2009

High-End Audiophile Headphone Amplifier

Kelvyn Shaw in the UK sent us a note with a link to his latest DIY Audio Project - a High-End Headphone Amplifier. The headphone amp is made using only premium components and built around the National Semiconductor LME49710 high-performance Hi-Fi operational amplifier which is noted as costing 20 times more than your typical op-amp.

DIY High-End Headphone Amplifier PCB
LME49710 Headphone Amplifier
Kelvyn notes that the amplifier "Uses only the finest audiophile quality components that have been carefully selected with no expense spared". Power is supplied through a regulated dual rail power supply using a low noise toroidal transformer. The amplifier is housed in a black anodized aluminum enclosure with a heavy duty clear anodized aluminum front panel. An Alps Blue Velvet potentiometer is used for the volume control.
DIY High-End Headphone Amplifier
LME49710 Headphone Amplifier
DIY Audiophile Headphone Amplifier
Finished LME49710 Headphone Amplifier
From the BOM, the cost of the headphone amplifier is about £163 which is about $265US (4 Sept 2009). This is an advanced DIY project but for those who are are to the challenge, all the necessary information (schematic, BOM, PCB gerber data and enclosure panel drawings) to build one for yourself is available from Kelvyn's website KS Projects - Headphone Amplifier along with several construction photos. Nice work and enjoy your headamp.

More DIY Headphone Amplifier Projects:

What's Playing: Joni Mitchell - Wild Things Run Fast

24 August 2009

6418 Sub-miniature Tube Preamp / Headphone Amp

We often get questions asking about suitable vacuum tube (valve) kits for beginners or first time DIYers. Aside from the fact that vacuum tube audio kits are generally expensive, there is also the safety concern that most tube circuits operate with potentially lethal voltages. Mark in Australia found the following 6418 tube preamplifier and headphone amp kit which is an exception - it is inexpensive and can operate from single 9V battery.

6418 sub-mini Tube Preamp / Head Amp Kit
The tube preamp / headamp kit is from Oatley Electronics in New South Wales Australia and based around the Raytheon JAN6418 sub-miniature valve (tube) and an IC. The K272 Stereo Tube Preamplifier – Headphone Driver kit cost $27AU (~$23US – August 2009). The kit is complete including a printed circuit board (PCB) which makes for easy assembly but you will need to provide your own enclosure. The kit only consumes about 12mA at 9V and can be powered with a single 9V battery making this a safe and ideal kit for those who are new to vacuum tube electronics.

6418 Tube Preamp / Headphone Amp Kit

The photo above is a build of the kit using the supplied parts. Since the 6418 tube are extremely microphonic and will "ring" if they are subjected to vibrations rubber grommets are used to help damp the tubes. Mark has built a number of these kits now including a few with upgraded parts (metal film resistors, polypropylene film inter-stage capacitors and a Burr-Brown OPA2134 op-amp). The photo below is a tube preamp in a plastic ABS enclosure using the kit and upgraded components.

6418 Tube Preamplifier Kit
Mark reports that the kit performs well and sounds good. The bandwidth is very wide, the -3dB points are 10Hz and 50kHz. As a preamp there is good depth, wide breadth and sharp detail revealing fine recorded detail with no hard edges. The photo below shows the kit in a plastic enclosure being used as a portable headphone amplifier.

6418 Tube Headphone Amplifier Kit

The tube preamp / headamp kit from Oatley Electronics is well worth the $27AU price tag. For complete project details and more variations see the project page for the 6418 Tube (valve) Preamplifier / Headphone Amp Kit.

Additional Tube Headphone Amplifier Projects:


What's Playing
: Roy Orbison - Shahdaroba

05 July 2009

Hi-Fi Chip Amplifier (chipamp) with TDA2050

Thomas from Germany has put together a build log of his recent DIY TDA2050 Hi-Fi Chip Amplifier (chipamp) build. The chipamp project is built around a single chip - the TDA2050V integrated circuit (IC) which is produced by STMicroelectronics. The TDA2050 chip is capable of producing about 25W of output into 8 ohms with 24V power supply rails. Like most chipamp projects, the circuit is very simple and can easily be constructed on perfboards.

TDA2050 Chipamp Circuit on a Perfboard
The power supply is also constructed on a perfboard. For the power supply Thomas uses a 120VA torroidal transformer with dual 18V secondaries and generally followed the "snubberized" Gainclone power supply design by CarlosFM with 10,000 uF per rail.

DIY TDA2050 Mini Gainclone Chipamp

For the enclosure Thomas used a Hammond satin black steel 12" x 8" x 3" chassis (Model 1441-24). The amplifier controls including a headphone output are on the front.

Finished DIY TDA2050 Chipamp

Thomas reports that the chipamp produces very good sound and that the small amp can hold it own against various high quality amplifiers that he has used. For complete project details, see the DIY TDA2050 Hi-Fi Chip Amplifier (chipamp) page.

These chipamps are simple to build, low-cost and when properly implemented can deliver very good fidelity. If you are looking for a project to try out, give one a try.

Additional Chipamp / Gainclone Projects:
What's Playing: Natalie Mechant - San Adreas Fault

31 March 2008

DIY OP Amp Based Preamplifier

INTRODUCTION
After building a OPA2134AP CMoy / Grado RA1 headphone amplifier in a timbre box, I wanted to try this high performance OP amp in a line stage / preamp. Rod Elliott's High Quality Audio Preamp (Mk II) which is a two stage preamp with balance control seemed like a good choice.

DIY PREAMP AND POWER SUPPLY

Two small pc proto boards (Radio Shack 276-159 / Dick Smith H5601) were used to accommodate all components. Metal film polypropylene capacitors were used in the signal path. It would have made the whole project easier by using physically smaller caps but for me the sound was a priority. For the power supply I used a 1.2A 18V regulated SMPS wall wart. I definitely do not need 1.2A, but I wanted a gutsy supply. Two 1k 0.5W resistors make up the "virtual ground" split supply. 220 uF low ESR capacitors and 0.1 uF decoupling capacitors are used for channel. This simple supply configuration works very well and is dead quiet.

DIY OPA2134AP Linestage Preamp PCB
PREAMP ENCLOSURE
The case only measures 115 X 90 X 55 mm (same size enclosure that I used for my Nanoo LM3875 Gainclone) and placing all the components in this tiny space, including a dual gang volume control and balance control was going to be tough. Unless you enjoy working in ridiculously small spaces and/or you are masochistic, build this preamp in a bigger case. Even a slightly bigger enclosure would be better. For the finish I use an acid etch primer, allowed a few days drying and then the spray color over the top. This was the same technique used with the big red caps on the Synergy Roasting Pan LM3875 Chip Amp / Gainclone.


DIY OPA2134AP Linestage Enclosure Front
DIY OPA2134AP Linestage Enclosure Back
RESULTS

I have used the preamp as a front end to my S-5 Electronics K-12 Tube Amplifier. The test setup comprised a NAD C542, modified bookshelf speakers and DIY Silver Interconnect Cables
. The preamp added nothing and took away any CD player/ Valve power amp miss-match. For that reason I have named it Neutrino. The balance control has a very wide sweet spot and the volume control was non-twitchy, linear and easy to use. A very inexpensive project but it feels odd to build something that adds and removes NOTHING audibly in a cute box. Try it.

Mark Houston


Other DIY Audio Projects by Mark:

03 December 2007

DIY Class-T Amplifier Kit (AMP6)

It has been a long while since I added one of my own projects to the diyAudioProjects.com website. I had actually finished this project back in the summer, but never got around to pulling together a web page for it until now. Over the past few years I have read a lot of good things about Class-T Amplifiers (T-Amps). For those who are unfamiliar with T-Amps, the chip manufacturer (Tripath) describes the Class-T amplifier chip as one that can offer both the audio fidelity of Class-AB and the efficiency of Class-D.

DIY Class T Amplifier Kit (T-Amp)
I decided to try a kit from 41hz.com as they are priced very well and I have read several good reviews of their T-Amp kits. I opted for the AMP6 kit which uses the popular Tripath TA2020 chip. The kit was only $39 and fairly simple to put together.

For the enclosure, I used a prefabricated aluminum chassis. The results are a little industrial looking, but heck, I am interested in the sound quality, not the enclosure.

Finished AMP6 T-Amp Kit
A lot of people describe T-Amps as having a "warm tube like sound". I didn't think so. I did not like the sound when mated with high efficiency fullrange speakers. However, with more traditional speakers (2 and 3 way) I was very pleased with the performance of the little AMP6 (about 12W into 4 ohms and only 7W into 8 ohms). It provided accurate tight bass and detailed mids and high. While I prefer the sound from my DIY LM3886 Chipamp (gainclone) Kit, the AMP6 is a solid preforming small amplifier with an excellent price to performance ratio.

Full details of my experience with the AMP6 and additional photographs are available at the AMP6 (T-Amp) - DIY Class-T Amplifier Kit
project page.

What's Playing: New Order -Vanishing Point (instrumental)

05 October 2007

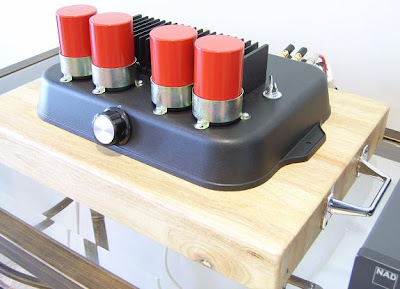
Synergy - LM3875 Gainclone Amplifier

Mark has been hanging out in the kitchen and has put together the Gainclone amplifier shown below.

LM3875 Gainclone Chip Amplifier
For the enclosure, Mark has used a heavy cast aluminum cooking pan and a massive wooden cutting board. The amplifier is based around the LM3875 chip (power opamp) and uses point-to-point wiring. The amplifier follows the
"rigid and compact" approach of the 47 Laboratory Gaincard amplifier. A rigid enclosure is used to reduce resonance and vibration while a short signal path, feedback loop and minimal parts (compact) are used to preserve information. The schematic of the three resistor amplifier is shown below.

LM3875 Gainclone Chip Amplifier Schematic
Keep cooking Mark, as I look forward to more of your projects. See the project page for full details of Mark's Synergy - LM3875 Gainclone Chip Amplifier Project.

Related DIY Gainclone Projects:
What's Playing: Jane's Addiction - Sympathy (on Radio Nigel)

13 August 2007

Grado RA1 Headphone Amplifier

A while back I got the headphone bug and purchased a pair of Grado SR80 headphones [new model: SR80i]. I am very pleased with the inexpensive ($99US) headphones which deliver great value.  The Grado SR80 headphones have an impedance of 32 ohms, so I built a CMoy Headphone Amplifier in an Altoids mint tin to drive the somewhat demanding headphones. The results were surprisingly good, especially when you consider that one can easily build a CMoy Head Amp for about $20. The CMoy was a huge improvement to a portable media player and rivals the performance of the built-in headphone amplifiers on NAD C162 and NAD 1020 preamplifiers.
A while back, I was showing off the Grado SR80 headphone / CMoy combination to a good friend. He is the Walkman, Discman and now iPod type who typically lives with the factory supplied headphones until they die, replacing them with similar light travel headphones. He was stunned with the amazing sound quality, so I let him live with the Grado / CMoy combo for a while. Not surprising, he loved the sound quality, but found that the Grado headphones were too bulky and leaked too much sound for use on public transit.

While he found that the combo was not suitable for his daily commute, he was in love with the amazing sound quality and decided to spoil himself. He purchased a pair of Grado SR225 headphones and a Grado RA1 headphone amplifier for use at home.

For those of you who are not familiar with the Grado RA1 headphone amplifier, it is well regarded, runs off of two 9V batteries, is housed in a beautiful mahogany enclosure and retails for about $350US. A stock photograph the Grado RA1 is shown below.

Grado RA-1 Headphone Amplifier
Grado RA1 Headphone Amplifier

Recently I had the opportunity to visit and listen to his Grado SR225 / RA1 combination. Of course I brought along my little pocket CMoy headphone amplifier!


We both did some blind listening and in the end we pretty much had the same listening impressions. We thought that both the CMoy and RA1 amps sounded excellent and fairly similar, but we both gave a slight edge to the DIY CMoy amplifier. We were both a little surprised, considering you can build a CMoy for about $20 or buy an already built one for about $40 on eBay, yet the Grado RA1 rings in at $350.


After a few Google searches, we found that others had reported similar listening impressions between the two amps. That being, they both sound very good, with similarities between the two and the slight edge going to the CMoy.  


Dissected Grado RA1 Headphone Amplifier

But what I found most interesting were these two sites, one which showed the dissection of a Grado RA1 headphone amplifier and the other which also took apart and upgraded the Grado RA-1. The sites provide pictures of the inner details of the RA1 and also a schematic for the amplifier section.  The schematics below show the both the Grado RA-1 and CMoy headphone amplifiers.


Schematic - Grado RA1 Headphone Amplifier

Schematic - CMoy Headphone Amplifier
Both the Grado RA1 and CMoy designs use a basic non-inverting amplifier circuit using an operational amplifier (opamp).  For my CMoy, the opamp used was a OPA2132PA (Burr-Brown) which retails for about $5 and for the Grado RA1 uses a JR4556 that retails for about $0.50. Despite the fact that the JR4556 is a low cost opamp, the RA1 sounds decent, but not as good as a properly implemented CMoy headphone amplifier - (DIY lets you choose the gain setting).

Related Posts:

25 April 2007

The "Beast" - A LM3875 Chip Amplifier

Bruce has put together a LM3875 based Non-Inverting Chip Amplifier using the LM3875 kits available from audiosector.com. He has affectionately named his project the "Beast". For the enclosure, Bruce used plastic and aluminum project boxes from Radio Shack. The power supply consists of a 200VA toroidal transformer and is housed in a separate enclosure.

LM3875 DIY Chipamp Kit
Consistent with what most are chip amp kit builders have been finding out, Bruce has found out that these gainclone kits result in a great sounding amplifier at a reasonably low cost. For more information about this project, see The "Beast" - LM3875 Chip Amp.

Related Posts:
What's Playing: Aztec Camera - Oblivious (Remix)

18 December 2006

Nanoo Chip Amplifier (LM3875 Gainclone)

Here is another one of Mark's projects which has been added to DIY Audio Projects website. His latest creation is the compact DIY Nanoo Chip Amplifier (LM3875 Gainclone).

Nanoo Chip Amplifier (LM3875 Gainclone)
The enclosure for the amplifier is a tiny aluminum box that measures 119 X 94 X 34 mm. The amplifier is based around the popular LM3875 chip using point-to-point wiring. Power to the amplifier is provided via an external power supply which is also housed in an aluminum enclosure.

See the project page for more pictures and information about the Nanoo Chip Amplifier (LM3875 Gainclone) Project.

Related Projects:
What's Playing: The Church - Metropolis

07 November 2006

CMoy Mint Tin Headphone Amplifier

Originally Posted: 21 June 2006
A while back I purchased a nice pair of cans ... Grado SR80 Headphones. When I bought them, I knew that they would drive me to build a DIY headphone amplifier. Well, here are the results ... A very simple CMoy mint tin headphone amplifier.

Grado SR80 Headphone and CMoy Amplifier
The CMoy is a very popular and easy to build headphone amplifier that can be fit into a mint tin. It can be used to drive demanding headphones, produce thunderous volumes and most importantly, it sounds excellent. The original article A Pocket Headphone Amplifier by Chu Moy discusses all the fine points of the amplifier, while How to Build the CMoy Pocket Amplifier provides excellent and easy to follow building instructions.
My version of the CMoy headphone amplifier uses two nine volt batteries, the OPA2132PA (Burr-Brown) operational amplifier (opamp) and I originally set the gain to 9 - which turned out to be far too high. I have since adjusted the gain down to about 3. Since I will be using this with a portable MP3 player, I elected not to include a potentiometer as the volume will be controlled through the MP3 player.

CMoy Headphone Amplifier in Altoids Mint Tin
The CMoy headphone amplifier sounds pretty darn good when you consider the simplicity and low cost. It provides excellent clarity, even at high volume. The headphone amplifier does not seem to add its own colorations to the sound and there is a lot of detail. The amplifier is very well behaved and there are no pops when powering up or hiss during operation. Overall, this is a very nice little performer and it considerably increases listening pleasure with a good set of headphones.
Related Posts:

What's Playing: Joy Division - She's Lost Control

06 November 2006

LM3886 Chip Amplifier (gainclone)

LM3886 ChipAmp (gainclone)Originally Posted: 3 May 2006

After several months of planning and acquiring parts, I finally got down to constructing a chip amp (gainclone). The amp uses the National Semiconductor LM3886 chip with printed circuit boards (PCB) purchased from chipamp.com. I finished the amp late last night, so I only have about 3 hours on it and I don’t think it is burnt in. So far it sounds pretty good. It sounds much better than it should given the simplicity and low cost of this amp. There is a lot of power available and the bottom end is very good. It sounds a little bright and tinny to me right now, but I will reserve judgment and make a comparison to my S-5 Electronics K-12M tube amplifier kit after several more hours. More information about this project is available at the LM3886 Chip Amp (gainclone) project page.

Related Projects:
What's Playing: Odds - Love Of Minds