Showing posts with label other. Show all posts

25 June 2012

DIY Stepped Attenuator Volume Control

The latest project to be added to the site is a DIY passive volume control which is made using a switched attenuator.  A stepped attenuator operates by switching to different resistors at each of switch settings.  The benefit of a stepped attenuator is that it can use low noise metal film resistors making them quieter than typical hot formed carbon and conductive plastic potentiometers.  The volume control uses a stereo 100k 24-position stepped attenuator which comes fully assembled for $18US from 8 Audio-Mall.  The attenuator uses 1% precision metal film resistors on a "make before break" multi-position switch.  A photo of the stepped attenuator is shown below. 

stereo 100k  24-position stepped attenuator
stereo 100k  24-position stepped attenuator
The stepped attenuator is housed in a small wooden enclosure with aluminum top and bottom plates.  A knob, RCA jacks and a 4 Pole Double Throw (4PDT) switch round out the DIY volume control.

DIY Stepped Attenuator Volume Control
Matt reports that he is pleased with the results of the stepped attenuator volume control as it is significantly quieter than any of the carbon and conductive plastic potentiometer he has used.  The attenuator was measured to have a noise figure which is about 26dB lower than a typical PEC hot molded carbon potentiometer of the same value.  For full project details, see the DIY Switched (Stepped) Attenuator Passive Volume Control project page.


More DIY Volume Controls

22 November 2011

Informal Comparison of Six Phono Preamps

This is a project that sort of evolved from an interest to see how good a particular phonograph preamplifier was. Not the one I designed, but one from a DIY kit. If I would have known how difficult and possibly inconclusive it would become, I might have not done it. As it was, the experience was valuable in several ways. First let it be clear in everyone’s mind that this comparison is largely subjective and based on what I hear or can measure. It was concerned with only those preamps that I had available at the time and your thoughts and results could be quite different. The comparison demonstrated that without a top notch system nearly any preamp might be OK. The flip side was also true that in a top notch system, many preamps would be unacceptable. Another thing that came from the listening and testing is that compliance with RIAA equalization varies from company to company but in many cases might not be audible. My method for comparison had two parts. The first was to listen to various selections of music with each preamp and then score them on various things I felt meaningful. The second was to check various parameters with my test gear. The following six phonograph preamps were the ones compared:
Left top, Moon LP3, left middle TC 750, left bottom Jaycar KC5433,
Right top, Groove, right middle K303, right bottom DH101
General
The various phonograph preamps cover a wide range of designs and prices. The lowest cost ones are approximately $50 (TC750) and the most costly more than 10 times as much (LP3). One has an undetermined price at this time (Groove) and is likely to be above the upper end of the group even in kit form. Design variations range from entirely IC to all tube. Some use single ended configurations on the active devices, one uses fully complementary differential style (DH101) and one SRPP (Groove). All are designed as stand alone devices with the exception of the DH101 which is a complete preamp. All are MM/MI compatible with the LP3 also covering MC applications. All, but one, are solid state devices. There will be two phases, bench testing and listening.

Equipment Used For The Listening Portion 
  • Pro-ject Debut III turntable with acrylic platter and Speedbox 
  • Dynavector 10X5 high output MC cartridge (re-tipped with ruby cantilever by Sound Smith) 
  • 80-Step Passive preamp (1% precision resistors) 
  • Oddwatt KT88 Monoblock valve power amplifiers 
  • Martin Logan Vista electrostatic speakers (operating full range) 
  • Marchand electronic crossover (50 Hz low pass / 24 dB per octave to subs only) 
  • AudioSource Amp 100 dual 50 watt RMS solid state power amplifier (for the sub) 
  • Custom designed 7 cubic foot subwoofers, 15" drivers (F3 = 22 Hz) 
  • APC H10 AC line power conditioner
Listening Tests
Listening tests were performed first to avoid prejudging performance based on what the test measurements might indicate. Music selections consisted of new and older records. The music selected was varied and covered a wide range of genre. Different selections might have provided different results, but I tried to span a wide range. There were acoustic stringed instruments, male and female vocals (duets too), classic rock music, music with keyboards, solo jazz singers and big band. Each preamplifier was played in turn with the order mixed up with the same selection.

The listening performance was subjective and the various ratings are solely those of the tester. Scoring was as follows: Numeric grade of 1 to 10 with 10 being the best. 10 = among the best I have ever heard, 8 = excellent performance, 6 = average performance, 5 = minor deficiencies, below 5 increasing levels of unsatisfactory performance. Areas rated were: Signal to noise – both hum and / or background noise (only in bench testing unless one is obviously deficient during the listening tests), treble response, mid range response, base response, image centering, low level detail, sound stage width, and overall involvement of the sound.
(click to enlarge)
(click to enlarge)
(click to enlarge)
Listening Test Results
It seems that price and to a certain degree complexity matters. The three most pricy or complex designs were clearly better than the lower cost three. All of the top three excelled in some areas. There is a different flavor to each that shows up in how they rendered the different musical tracks. The Groove was a clear standout in the bass region. Solid, deep and well controlled bass was noted in all cases. Other preamps occasionally got into the sub 50 Hertz range, but none with such authority. The LP3 was second in this area and was clean and well controlled, but not nearly as authoritative. The DH101 had deeper bass than the LP3, but it was not as clean and well controlled. At the opposite end of the range, the LP3 had a slight edge on all others in treble presentation. The Groove was a close second and often they were tied. In the areas of inner detail, imaging and sound stage width the differences were often linked to the particular music being reproduced. It was largely a toss up between the LP3 and Groove with the edge going to the Groove. The primary difference between the top two preamps is one of flavor. The LP3 has a crisp clean leaning toward neutral sound and the Groove a warmer more delicate sound. Either would be satisfactory in many systems. The DH101 fell slightly short of the performance of the top two, but was in most areas a rather nice sounding preamp. The three preamps in the “budget” category were sort of a mixed bunch. They clearly were in a different category from the top performers. In some cases they would be good entry level preamps for someone just starting in vinyl. The TC750 even with upgraded components was at the bottom of the group. It performed in what I would generally characterize as less than average manner. It really has no place in a quality system. The other two (Jaycar KC5433 and the K303) are fairly well matched. Each is slightly above the average level, but well short of the top performers. Generally their shortcomings were by omission and not commission. They are characterized by things such as less detail, less response in various parts of the spectrum and the like. They did exhibit some sibilants and edgy sounding behavior on various selections, but were mostly listenable. I felt that the level of listening involvement suffered from the omissions. I would not recommend them for use in systems above the rather modest level. It must be noted that the two are diy kit based and low cost and would not be expected to compete in the same arena as the top performers. For entry level systems they might be a reasonable option. The K303 has two gain options and the recommended setting (less gain) resulted in an output significantly below all the other preamps. I changed the setting to the higher level and the output them was approximately equal to the other preamps.
(click to enlarge)
(click to enlarge)
Equipment For The Bench Testing
  • HP 331A distortion analyzer
  • Velleman PCSD 1000 PC based digital storage oscilloscope
  • Tenma  digital storage oscilloscope
  • Tenma precision signal generator
  • Circuit Specialists MS8040 true RMS multi-meter
  • B&K 290 electronic analog multi-meter
  • APC H10 AC line power conditioner
Bench Testing
All six phonograph preamps were bench checked with my typical set up of equipment. My results may or may not agree with results by other individuals, but are consistent among themselves. A long standing issue in my workshop is a relatively high level of electronic noise. All my equipment is fitted into a fairly small area and a lot of it generates noise. The noise floor in the shop is typically -91 to -95 dBv. This necessarily limits my ability to test really quiet equipment. This was the case with two of the preamps. On the day of the tests the noise floor was -91 dBv. The Moon LP3 measured -91 dBv and the Groove at - 89.9. All those results can tell me is that both units are very quiet. The specification for the Moon is -106 dBv and the Groove has been previously measured consistently right at the noise floor (-90 to -91). The remaining 4 preamps did measure within the capability of my equipment. They ranged from as low as -81 dBv to a high of -84 dBv (more negative is better).

The gain of the preamps ranged from a low of 34 dBv (DH101) to 44.2 dBv (Groove). The remaining 4 units were all clustered around 40 dBv. Initially the K303 was about 2 dB lower than all the others (at an estimated 32 dB) and I made the kit indicated modification for additional gain. In my opinion the original gain would be insufficient for many systems especially those using passive preamps.

For signal to noise level I used a combination of the noise floor and the gain. It might be better called effective difference between the level of output and the noise floor for a given input signal. That way it would provide an indication of how quiet a preamp would seem in any particular system. The more output you have from a preamp the less follow on gain you will need to use for a comfortable listening level. Then turning down of the system gain will apparently lower the noise floor of the entire system. The opposite is equally valid. An apparently excellent noise floor could be offset by low gain with the result being an apparent higher overall noise level in the final sound level from the system. The results here favored the Groove with its higher gain; however the Moon would probably be better if the actual noise level could have been measured. Both are extremely quiet in use. The remaining units were within a 5 dB span with the DH101 with the lowest apparent signal to noise ratio. None however exhibited sufficient noise to detract from the listening experience.

Distortion levels were measured at 1000 Hertz at the 1 volt RMS level into a 10k-ohms resistive load. Capacitance was minimal at approximately 100pF due primarily to the short cables used in the test set up. Deviating from my usual procedures, I used a battery powered signal generator. This eliminated a number of possible noise sources that would be considered by my distortion analyzer as distortion. For it anything that is not the fundamental is considered distortion. The penalty in doing this is that the residual distortion in the generator was 0.44%. However, since all preamps were tested the same the results while not definitive do provide a comparison. It should be noted that doing a complete test of the distortion levels and subsequent matching to the RIAA standard is a very time consuming process and was not the focus of this comparison. The actual distortion levels ranged from 0.65% for the Moon to 2.3% for the Jaycar. As noted in the listening tests there were no specific instances of audible distortion, but rather some less than stellar performances. Of particular note were issues with the TC750. In testing it was discovered that it had a very low output capability. It was unable to deliver over 1.75 volts RMS at low to mid frequencies and above approximately 10 kHz it could not deliver over 0.5 volts RMS without visible distortion of the wave form. All other preamps were able to deliver over 5 volts output at any frequency easily.

To determine basic compliance with the RIAA standard, I used 5 separate frequencies. All preamps were tested at the one volt output level except the TC750 that was unable to deliver that level and it was tested at the 0.5 volt level. The chosen frequencies were picked as they are the ones where the worst performance could be expected. This is at the upper and lower extremes of the audio band in comparison to the 1000 Hertz reference. My experience has been that nearly any phono preamp can come reasonably close to the standard between the limits of 100 Hertz and 10,000 Hertz. There is some disparity in what various manufacturers do at frequencies below 50 Hertz and above 15,000 Hertz. Some either flatten the curves there or in some cases actually intentionally reduce response there. The thinking behind this is most likely that there is little musical content there and there are possible benefits to the signal to noise and cancellation of rumble and low frequency resonances. In my opinion, the preamplifier should reproduce whatever signal it is fed and problems with noise should be handled at the source. As noted in earlier paragraphs, the measurements I made might or might not be the same as someone else would get, but all units were tested the same and the results allow for some comparisons. There really was no perfect fit. However the Groove, Jaycar and (surprise) TC750 were closest. The Moon was excellent on the high end, but for some reason demonstrated a reduction at 50 Hertz (only a dB) and a rapid reduction in response at 20 Hertz (3 dB). The K303 was significantly off at 50 and 20 Hertz and I can speculate it was because of its high sensitivity to the load. This was evident when a quick check of each preamp was done with a 5 k-ohm load in place of the standard 10k one. The only preamp that demonstrated a significant drop in output was the K303. The reduction was approximately 3 dB at mid band. This factor may limit its application to only systems with relatively high input impedance (the test system was approximately 50 k-ohms).
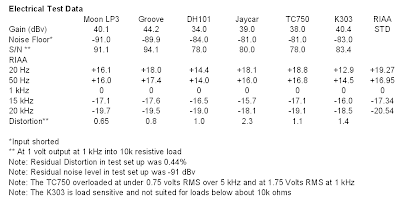
Electrical Test Data (click to enlarge)
Summary and Conclusions
Since the comparison was largely subjective with some bench testing used to verify or at least establish some relationships between the preamps, the conclusions necessarily are also subjective. None of the three “budget” preamps should be considered anything but entry level devices. The TC750 is at best a marginal one even in that group. The K303 and Jaycar are fairly well matched, but have slightly different sonic signatures. In modest and undemanding systems they would probably be adequate. I would not use the K303 without the modification for higher gain. The notation in its instructions that the extra gain would allow it to be used with low output moving coil cartridges is suspect. With the extra gain it was right in the middle of the group for moving magnet / moving iron cartridges. I would also not use it systems in which the following equipment had an impedance lower than 10K ohms and preferably with ones above 50K. The DH101 was a surprisingly good performer considering it was included primarily as a comparison of older technology, granted one with some exceptional design features. It would have fared better with more gain, but since it is actually part of a complete preamplifier it is entirely likely that the shortage in gain was compensated for in later stages. The remaining two preamps are both excellent and quite different in many respects. Both are extremely quiet. They have low distortion and with the exception of the curious bass reduction in the Moon, match the RIAA curves well. They both sound excellent, but different. The Moon is articulate and the Groove robust. Each is a product of its technology. The Moon is all solid state IC based. The Groove is an all valve design. The end choice is likely to be whether you prefer solid state sound or valve sound. I will not argue for either case as both are valid at the personal level. My personal preference is for the sound of the Groove, but I could, and have listened happily to the Moon for nearly a year while designing and perfecting the Groove.

Good listening,
Bruce Heran

14 June 2011

Fundamental Amplifier Techniques with Electron Tubes: Book Review

Late last year Elektor released their most recent publication on the increasingly popular subject of hi-fi tube audio, Fundamental Amplifier Techniques with Electron Tubes by Rudolf Moers.  The new book is actually the English translation of "Fundamentele versterkertechniek met elektronenbuizen" (ISBN 978-90-5381-226-6) authored earlier in Dutch by Rudolf Moers.  The thick hard bound book is 834 pages and seemingly covers what appears to be just about every topic on the subject of audio amplifier design with vacuum tubes.  I recently had an opportunity to read the book and here is my overview of the new electron tube book. 
Fundamental Amplifier Techniques with Electron Tubes - Rudolf Moers
The thick book is divided into ten chapters. At just a few pages each, the first two chapters, (1) Introduction and (2) Principles of Electron Emission are very small relative to the remaining chapters and book.  These very short introductory chapters provide only a very brief overview and assume that the reader has a reasonable background in electronics.  The meat of the book begins with chapters 3, 4, 5 and 6 which each respectively go on to cover the basic electron tube types: diode, triode, tetrode and pentode.  For each of the basic tube types the chapters generally include information on tube construction techniques, the tube characteristics, all the typical tube applications and several design examples.  The chapter subsections are quite detailed and will for example get into the formulas and calculations of AC ripple that can be expected in a C-L-C pi-filter and calculating gain of as common cathode amplifier.  Over 200 pages are dedicated towards the pentode and over 250 pages are spent on the tridode.  The book also contains many technical questions which the reader can work through, much like the questions that would be found in a science text book.  A detailed solution accompanies each of the questions and this makes the book a very good learning tool for those interested in audio theory and design.  Frequency Dependent Behavior is covered in the 88 page Chapter 7.  The chapter goes into details regarding linear distortions for the various components that make up an amplifier.  Non-Linear Distortions and Noise are discussed in Chapter 8 and the various types of Negative Feedback is the topic for Chapter 9.  The final chapter (10) pertains to the construction of electron tube amplifiers.  As a builder of amplifiers I found interest in this chapter as it contained good practical information on electronics components, various construction techniques, crosstalk, heat / cooling issues, grounding, shielding and safety.  Also included in Chapter 10 are additional details of Rudolf's parallel push-pull 300B monoblock tube amplifiers among other of his amplifier builds.

The full table of contents for Fundamental Amplifier Techniques with Electron Tubes is available from Elektor's website [PDF - 163kB].

The book which is written in a technical format with plenty of theory, math and graphs will be primary suited towards advanced hobbyists with a strong understanding of analogue electronics and towards students and professionals involved electrical engineering and audio design.  Those without a good background in electrical science may not find the text and formulas all that easy to follow.  The carefully written book is a significant undertaking and provides plenty of accurate and valuable theoretical information on numerous subjects related to understanding and designing electron tube amplifiers.  Congratulations to Mr. Moers and his colleagues for the excellent learning tool and resource that they have compiled.  I will continue to find value in this book as a reference resource in my workshop.
The book Fundamental Amplifier Techniques with Electron Tubes, by Rudolf Moers (ISBN 978-0-905705-93-4) is available for $104.90US (plus shipping) from Elektor.

More DIY Audio Books

12 April 2011

How to Solder - Comic Book Guide

There are a number of great soldering tutorials already available via the internet in the form of videos and webpages and today I came across another great soldering guide - this one packaged in a comic book format (see below for PDF download link).


The great new seven page comic book guide about how to solder has been put together by Mitch Altman (Cornfield Electronics) , Andie Nordgren and Jeff Keyzer (Mighty Ohm).  The comic book guide is based on the popular one-page soldering guide below that Andie and Mitch made last year. (Click image to enlarge)

 
The Soldering Is Easy comic book guide is easy to follow and informative.  The guide is published under a Creative Commons License and the link to the PDF version of the soldering guide is below.

Soldering Is Easy - Here's How To Do It

07 December 2010

The Fine Wire Audio Cable Shoot-Out

After finishing the SuperCables CookBook by Allen Wright I decided to make some audio cables.  One of the concepts that Allen pushes in the book is very thin wires.  Originally I had no intentions of making any cables from the book but after reading through the book I got the urge.  According to Allen thin is in.  I chose to try a couple of the designs that use wire wrap wire (WWW).  Details of the cables that were built using WWW are noted in Part 2 of the SuperCables CookBook review.

The HiFi Test Set-up
The test set-up used to evaluate the cables consisted of an upgraded Oppo 980H, a diy build of the Nelson Pass B1 buffer preamp, a diy 6AS7 SET power amplifier and Fostex FE206En drivers in a back loaded horn enclosure.  I selected a number of test tracks which I thought had enough variation to exhibit any great cable sonics.  To make sure I was not biased I enlisted the aid of a golden eared friend, Ron from the Melbourne Audio Club.  He also brought along his test tracks.

Oppo 980H, Pass B1 Buffer, 6AS7 SET, FE206En Rear Horn

Cable Shoot-Out
We played through about half a dozen test tracks using both short and long runs of #1, Air-spaced Finewire RCA cables and set of #6, Air-spaced Finewire speaker cables which were 2 m in length.  My SET amp produces only 3W so fine wire speaker cables will work with this amp.  But will it be the best sound we can get?

What we found was in just three test tracks we could listen for:
  • The shimmer in cymbals
  • The breathiness in flute and its balance against a harp
  • The rich tone of a fully fleshed violin
Of course this in no way covers every tone or nuance of every sonic effect listenable on any recording but I feel it was enough to highlight the main differences in the cables.

After listening with the cable combination above we swapped the #1, Air-spaced Finewire RCA cables for a cheap $2 store bought RCA cable.  Some areas of the test music actually improved.  The sound stage appeared to widen or was it just smeared between the speakers.  The violin appeared to fatten-up or was the detail just lost.  Ron and I then, cable by cable, started putting back both sets of #1, Air-spaced Finewire RCA cables and the other various cables that we had on hand.

We started with the short #1, Air-spaced Finewire RCA cables which lead from the CD player to the preamplifier.  We also introduced my twisted version of the WWW interconnect cables and also my braided Silver Highway RCA cables.  I have built many sets of these high-purity silver wire RCA cables and everyone who has used them claims they are excellent.  At each stage we re-listened to the three test tracks.

What We Found
Without boring the pants off you with every detailed cable swap this is what we found.
  • The #1, Air-spaced Finewire interconnect cables work best between the CD player and the preamp (short cable, 150 mm long)
  • My diy Silver Highway RCA cables (900 mm) worked best between the preamplifier and power amplifier.  They worked better than my twisted WWW cable, but only slightly better.
  • Multi-stand heavy OFC speaker leads (3 m long) with heavy brass banana plugs only just outperformed the #6, Air-spaced Finewire speaker cables (2 m long).
Cable Measurements
Ron brought his dedicated capacitance and inductance meter and here are the cable measurements:

RCA Cables
#1, Air-spaced Finewire (short):  30 pF,  8 uH,  0.4 ohm
#1, Air-spaced Finewire (long):  30 pF,  13 uH,  1.5 ohm
Twisted cables (destination end):  13 pF,  8 uH,  0.4 ohm
Twisted cables (source end):  138 pF,  10 uH,  0.4 ohm
Silver Highways (900 mm):  71 pF,  2 uH,  0.3 ohm
$2 Generic RCA (1000 mm):  370 pF,  0.1 uH,  0.1 ohm

Speaker Cables
#6, Air-spaced Finewire (2 m):  25 pF,  17 uH,  1.5 ohm
Multi-stand heavy OFC (3 m):  210pF,  1uH,  0.1 ohm

Note: The twisted cables comprise of three wire wrap wires, only two of which are terminated at the destination end.  I believe the 30 pF of capacitance for some of #1, Air-spaced Finewire cables is due to the cheap RCA plug that was used.  The twisted cables had only 13 pF for the destination end which only has two wires connected.  Also the RCA  used on the twisted cable were heavy weight high-end types and I believe low capacitance types.

Just a Cable Suggestion
It is worth while trying different cables, weather you make your own or buy them off the shelf.  If possible, try borrowing some friend’s cables before outlaying hundreds of dollars on expensive ones.  Different combinations of cables can work better than just one cable type used throughout your system.  If nothing else, cable swapping and comparison will fill in an afternoon and you may enjoy the music along the way.

Mark Houston - retro-thermionic. 
To email Mark, type out the email address.

This concludes Mark’s three part series of the SuperCables CookBook.  For the full story, refer to the SuperCables CookBook (Part 1) which reviews the book and Part 2 of the SuperCables CookBook review which takes a look at a couple of the cable recipes.

Update (11 December 2010): I've updated the terminations for both the #1, Air-spaced Finewire RCA interconnect cables and the #6, Air-spaced Finewire Speaker Cables.  See the Skinny is in! - Thin wire audio cables thread for more information and further discussion.

DIY Cable Projects

05 December 2010

SuperCables CookBook - Review (2/2)

A couple of days ago I posted a partial review of the SuperCables CookBook by Allen Wright.  Of course there is not much use in working your way through a audio cable design book and then not building at least one of the cable designs.  In this second part of the SuperCables CookBook review I will share my experience with a couple of the book designs and also try a simple design of my own using some of the design concepts outlined in the book.

Over the past few years I have built a number of diy twisted RCA interconnect cables using high purity silver wire.  Some of the cable design concepts outlined in the SuperCables CookBook agree with my past construction methods.  So, can I use the new concepts to build a better interconnect cable?  There are several cable designs in the book and I chose to build the wire wrap wire (WWW) interconnect and the WWW speaker cables.  Wire wrap wire is typically 30AWG silver plated copper wire often insulated with Teflon.  It is cautioned in the book that the WWW speaker cables can be no longer than 2m and that they should be used for low power amps only.  My axe-of-choice when it comes to power amps is a 3W 6AS7 based SET (Single-Ended Triode) amp.  Perfect.  The book also cautioned that if you use these light weight speaker cables, you must remove all heavy connectors.

 #1 Air-spaced Finewire RCA Interconnect Cables

Constructing DIY Audio Cables
For my HiFi setup I needed to construct at least two sets of RCA interconnect cables and one set of speaker cables.  For RCA interconnect cables I built three sets in total of two different designs.  Following the book design for #1, Air-spaced Finewire, I built two sets of wire, one very short set and one about 900 mm in length.  The third RCA cable set was built by applying some of the concepts I picked up from the book.  For the speaker cables I followed recipe #6, Air-spaced Finewire.  All the audio cables were made using 30AWG wire warp wire.

For the Air-spaced Finewire speaker and RCA interconnect cables I followed the directions outlined in the book.  I even used $2 light weight plastic RCA plugs with insulated ears, as per the book.  But with the third pair of interconnects I mixed some of the concepts from the with other cable ideas I had used in the past.


In my Silver Highway RCA interconnect cables a three-wire braid using insulated pure silver 0.7mm (~ 22AWG) wires.  The extra earth wire is not terminated at the destination end.  The braided wires are encased in heat shrink and a ferrite choke is used at the destination end.  I used heavy RCA plugs and the connections are made using 5% silver solder.  The idea of the second earth wire is that it gathers electrical noise and drains it back to the source.  I think this cable sounds good and have built many sets for friends over the years.

To reduce the chance of picking up unwanted noise on these RCA cables which will be 900mm in length I lightly twisted the three wires using a variable speed drill.  The second earth wire was cut away at the destination end and fitted with a small choke.  High-end heavy Pro Co plated premium RCA plugs were fitted and silver solder used.  The #1, Air-space fine wire RCA cables may look cheap in comparison, but we are not here to win a beauty prize.

 My three wire twisted RCA cable

Where the book concepts have been applied in my three wire twisted RCA cables are:
  • Lightly twisted conductors;
  • Very thin conductors;
  • Silver solder;
  • Three wire construction;
  • Not terminating one earth;
  • Heat shrink to strengthen connection and hold twist in place;
  • No additional outer case;
  • Minimum length required;
  • Insulating wire strain ears.


Where the book concepts may not agree with my approach:
  • Heavy plated RCA plugs;
  • Ferrite choke;
  • Marking the cable directional;
  • Using this cable where the simpler two wire Air-space may work.

DIY Audio Cables made with Wire Wrap Wire

HiFi Listening Setup
I wanted to test out all these WWW cables I had made and followed the books suggestion to remove all heavy cables from my system.  The gear consisted of:
  • Custom Analogue modified Oppo 980H DVD/CD player;
  • DIY build of a Nelson Pass B1 Buffer (battery powered, WWW internal wiring);
  • 3W 6AS7 SET power amplifier;
  • Fostex FE206En back-loaded horn speakers;
  • Two pairs of #1 Air-space WWW interconnects;
  • 2M #6 WWW speaker leads.

HiFi Listening System

Air-spaced FineWire Cables Listening Notes
Usually when auditioning some new equipment you drop it into your existing system, pick your favorite test tracks and work your way through them.  You listen for bass extension and weight, mid-range clarity and texture, treble extension, soundstage depth and width etc. After a few tracks you will start to recognize that the new gear has made an improvement in some areas and a reduction in others. If you are riding a winner that day it will be win, win all the way.

But on occasions from the first few seconds of the first track you will be shaken to your very foundations.  You never expect it to happen but occasionally it does. You go from 0 to 100 in 10 seconds. The test set-up above caught my attention within the first few seconds of Stan Getz live. My mind struggled for the first second or two to track what I was hearing and place it in some logical place in conscience land.
The cymbals rang clean and clear like nothing I had ever heard.  All instruments were crisp, defined, real and raw.  It felt like I had thrown all my old gear out and just set-up all new gear from scratch.  Stunning.  And forget trying to find your speakers with your eyes closed.  They were gone, vanished never to come back.  What remained was a fat sound stage projecting from the back wall.  The sound stage could have been deeper but it was detailed and etched. 

I could go on for pages but let’s just say that these gossamer like ultra low-cost diy cables breathed new life into components, whose sound I knew very well.  They appeared to strip away so much vagueness in the presentation and laziness in the projecting of the over-all sound it was hard to comprehend. 
I spent six hours in a single listening session in front of the HiFi system above.  Not all recordings shook me as much as others but all seem to benefit.  Some recording far more than others and I’m not sure why.

Summary - Air-spaced FineWire Audio Cables
Ok, so you may have noticed there are no comments about how the air-spaced RCA cables tested or compared against my twisted set.  I’ll save those listening notes for a cable shoot-out and listening session report which will follow in a few days.  Just a comment about the #6 Air-spaced Finewire speaker cables.  Because I used no terminating connection they were clamped in the power amp and speaker binding posts.  As you can imagine, in time the thin wire will eventually break.  It is my intention to parallel a few inches of 1 mm thick pure silver wire to the ends of the speaker cables.  This should provide a light weight binding connection that will last for a while.

That’s it – now go and build some cables!

Mark Houston - retro-thermionic.
To email Mark, type out the email address.


For more details about the book, see Part 1, The SuperCables CookBook review.  In the third part of the SuperCables CookBook series Mark and Ron have a cable shoot-out with the new fine wire audio cables.  See The Fine Wire Audio Cable Shoot-Out story for the full details.

Update (11 December 2010): I've updated the terminations for both the #1, Air-spaced Finewire RCA interconnect cables and the #6, Air-spaced Finewire Speaker Cables.  See the Skinny is in! - Thin wire audio cables thread for more information and further discussion.

DIY Cable Projects

30 November 2010

SuperCables CookBook - Review (1/2)

Recently I got a chance to read the "SuperCables Cook Book" (3rd edition) by Allen Wright of Vacuum State Electronics and I thought I would share my findings.  As the title implies, this is an instructional book on how to make various cables.  The book covers balanced and unbalanced line level (interconnect) cables,  speaker cables, mains (power) cables, digital cables and even video cables.  The book is just shy of 200 pages and retails for 40 Euro and that price includes worldwide postage.

I thought of writing a book review only with no chat about the technical gems held within. That was until I finished reading the book through. I found not only some cable designs I would like to build but some confronting mathematical and theoretical proof that thin wires rule over thick wires.


SuperCables CookBook

SuperCables CookBook Review
The book is spiral bound, with a clear plastic front cover, black card-stock back cover and the paper quality is low.  For about the same money one can purchase beautifully bound, hard cover manuals full of color photos, but let's not judge a book by it's cover.  One plus about the spiral binding is the book will lay flat which makes it easy when working from a particular page.  Unfortunately the image quality is poor and boring – the images look like black and white copies of color photos.  You don’t find yourself looking at a picture of a good looking cable and think “I want to build that”, but don't let that discourage you.  Some of the images are of such poor quality that it is hard to work out what point is being displayed.

Apart from the usual trademarks, disclaimers, copyright warnings etc. The book opens with Contents, About the Author, Introduction and A Brief History.  It then works you through the theory and concepts of electricity traveling through a conductor.  The book then works it way into speaker cable constructions, interconnect cables, mains cables etc.  Toward the back of the book more varied cable types can be found, balanced, digital and even video cables. The list of cable types is very comprehensive.  I must congratulate the author on covering such a huge range of cables. 

Reading the Book 

There are three ways you can go about reading the book.
  1. You can read the book cover to cover;
     
  2. You could skip the preface, author, intro, theory and concepts and jump right to a cable recipe.  For many you can follow a recipe, construct the cable and enjoy while never looking back;
     
  3. But here is my suggestion after reading the book.  Read from the front cover to the theory. Jump the theory but read the concepts.  Then find your first cable to build and you will likely not stop at one.
Working through the theory and maths, no matter which famous mathematician developed them, will not make you a better cable builder.  However, understanding and the concepts for better cable construction and applying those concepts will.  If you read nothing else prior to your mystical journey into strange cables, read the concepts section from pages 42 to 52.  Other portions of the book that are must reads, Connector Basics and any of the other “Basic” sections in the book.  This may be “basic” information, but it is good information that is often overlooked or forgotten.

Cable Construction Pages
There are 35 projects in the book and the project page layout is excellent.  Across the top of the page is the cable project you about to start, “#7 Intimate Silver Foils” which makes it obvious what this cable is made of.  The other guides on this page are: Sonics, Difficulty, Pro’s, Con’s.  Some have a numerical rating other a verbal description.  The next section outlines the Materials required supported by some more images.  The Materials are numbered.  From here we go to Method, once again numbered.  At the end of the method, which is really a step-by-step list of how to put the cable together, you may find some other notes.  For example, “if using Lemo’s (a brand/type of connector) and “if using RCA’s”.  This layout makes it simple to follow and construct.  The author also makes comments about what you may experience when listening to the cables in an attempt to rate and compared the many cable recipes in the book.

Lessons Learned
Here’s what I discovered and do agree with:

  • Thin (even ultra fine) wire is better than thick wire;
  • Thin foil is better than thin wire;
  • Cheap light weight plugs are better sounding than extra heavy ones;
  • All dielectric is bad, some not as bad as others;
  • The best plug is no plug;
  • Separated wires sound better than clumped;
  • Solid core wire is better than stranded,
  • Solder with a few percent silver or copper is good;
  • The shorter the wire length the better (I think we all can agree here);
  • Skin effect does occur at audio frequencies;
  • Plumbers Teflon tape has more than one use;

Summary - SuperCables CookBook Review
As I stated earlier the book is very comprehensive on the subject of cables.  It also highlights tricks and traps when making cables and safety issues when dealing with mains power cables.   The book is well thought out, hand-holding and thought provoking.  The SuperCables CookBook challenges preconceived ideas about materials used in cables, cable construction, plugs and even how a cable should look.


At around $AU60 the book is not cheap.  Do I recommend the book? Yes I do.  If you want a good read, buy a novel.  If you are a DIY Hi-Fi nut, this book will ease your cravings.  Expert or novice the book guides you through each build with the goal of producing a better sound from your system at very little cost.  Just don’t tell your friends you replaced your expensive speaker cable with a few strands of 30 AWG silver plated copper wire wrap.  They may have you certified.


Mark Houston - retro-thermionic.

To email Mark, type out the email address.
 
Part 2 of the SuperCables CookBook review covers how a couple of the cable recipes from the book perform in my system.  In the 3rd installment of the series Mark and Ron give the 30AWG wire wrap cables a good listen.  See The Fine Wire Audio Cable Shoot-Out for the story.


DIY Hi-Fi Cable Projects

15 November 2010

Fundamental Amplifier Techniques with Electron Tubes

About 6 weeks ago Rudolf Moers shared with us the details around his parallel push-pull 300B monoblock tube amplifiers.  We noted that the design of the parallel push-pull 300B tube amplifiers is explained in his new book Fundamentele versterkertechniek met elektronenbuizen, ISBN 978-90-5381-226-6 which was at the time only available in Dutch.  Good news!  The English translation of Rudolf's new book is now available - Fundamental Amplifier Techniques with Electron Tubes.

Fundamental Amplifier Techniques with Electron Tubes by Rudolf Moers is the latest Elektor publication on the subject of vacuum tubes.  The 800+ page hard bound book covers just about every topic you need to know about the fundamentals of vacuum tubes and how to apply that information towards audio amplifier design.


The aim of the Fundamental Amplifier Techniques with Electron Tubes book is to give the reader practical knowledge about vacuum tube technology and how to apply that knowledge in audio amplifiers.  The practical applications include power supplies, audio design and DIY construction of tube based amplifiers.  This new book is much more than just building a tube amplifier from a schematic, it walks you through the theory so you understand the design of circuits and the accompanying calculations.  Then with a multimeter, signal generator and an oscilloscope, you can verify the actual circuit parameters to confirm the theory and practice are very close.  The 834 page book Fundamental Amplifier Techniques with Electron Tubes, by Rudolf Moers is bound in a hard cover and sure to be a must-have reference source for all tube audio fans. 

Fundamental Amplifier Techniques with Electron Tubes, by Rudolf Moers, ISBN 978-0-905705-93-4 is available for $104.90US (plus shipping) from Elektor.  The table of contents is available from the publishers site and you can take a look at Rudolf's parallel push-pull 300B monoblock tube amplifiers to get a visual image of the book contents.


More DIY Audio Books

13 July 2010

Design and Construction of Vacuum Tube Amplifiers


Design and Construction of Vacuum Tube Amplifiers

I frequently get questions about the design and building of vacuum tube (valve) audio equipment.  So I thought I would scribble down some of the tips and ideas that I have found useful.  This list is certainly not complete, nor a comprehensive guide.  There are numerous special circumstances that don’t fit the information.  I hope that it is of use to individuals that are either new to DIY valve audio or may help refresh others with things that they may have forgotten.
   

Initial Concerns

1.  First and most important, remember safety.  Nearly all vacuum tube amplifiers contain circuits with dangerous voltages.  If you don’t know what you are doing, don’t do it!  Mistakes can be fatal.

2.  Figure out what you are building and why.  What purpose will the equipment serve?  Will it be your main system, a secondary one, or just something for fun?

3.  Select your parts well.  If you use cheap parts, generally the end project will reflect that choice.  At the same time don’t waste money on parts that don’t matter.  Don’t get stuck on someone else’s choice.  Ask them why it is best.  If you are sufficiently knowledgeable, use parts you like.  Avoid getting trapped into thinking that tube equipment must be all tubes.  I greatly prefer high performance solid state rectifiers over tube ones of similar capacity.  I also use solid state constant current sources and regulators.  Use the type of component that best fits your needs and personal preferences. 

4.  Determine what tube types will do the job.  How much gain, power output, impedance, equalization?

5.  Is there already a design / circuit that does what you want that you can use?

6.  Can you get the parts needed?  Some parts are proprietary or discontinued and may be near impossible to get.

7.  Do not try to run components above their ratings.  Sooner or later they will probably fail.

8.  For power tubes, I recommend not exceeding 80% of the maximum dissipation.  This will also help extend the life of the tube.

9.  If a circuit requires matching of gain or output, it is better to include a way to do that.  In my experience “matched” tubes are not always equal.  Plus with aging they don’t generally stay matched forever.

10.  Select power transformers that can deliver at least 1.5 times the current you need.

11.  Consider heat buildup under the chassis.  A classic case often overlooked is that solid state rectifiers (diodes) have a voltage drop of 0.7 volts.  This times the current, for example 1 ampere will result in the generation of 0.7 watts of heat per rectifier.  A bridge then would generate 2.8 watts.  Heat is the enemy of things like capacitors. 

OK, let’s build it now ...

Design / Build Concerns

1.  Keep anything with AC voltages away from signal carrying parts or wires.  The further the better.  I like to keep a minimum distance of 2 inches.   Don’t get weird and go to huge extremes.

2.  Where power (DC or AC) conductors must cross signal wires or parts, do so at right angles with as much separation as is reasonable.

3.  Keep all wiring close to the chassis (particularly the corners) if the chassis is metal.

4.  Segregate power supply circuitry from signal circuitry.  Especially transformers.

5.  Put power transformers on the opposite side of a metal chassis as the active circuitry.

6.  Do not ground the inputs or outputs to the chassis.  This will nearly always will cause a ground loop.

7.  Use a “Star” or “Buss” grounding system.

8.  It is best to have a single connection between the power supply ground (B-) and the signal ground.

9.  If your electrical code permits (or insists) the metal chassis (if used) and all exposed metal parts should connect to the AC mains ground (not the neutral).

10.  Fuse the AC input.  It is a good idea to fuse the B+ inside the project as well.

11.  If your electrical code permits, connect the signal, and power supply grounds to the chassis at a single point through a  X2 type capacitor and resistor.  This is a great help in keeping noise low.  Do not use a standard capacitor.  Typical values are 0.1 uF to 0.22uF at 250 volts AC for the X2 rated capacitor.  The resistor is usually between 100 and 150 ohms and is a half watt to one watt preferably a flameproof version. 

12.  Keep capacitors, particularly signal carrying ones close to the chassis if it is metal.  Keep them away from filter capacitors and transformers.

13.  Keep component leads as short as possible.

14.  I like to use a consistent wiring color code for tube audio circuits, especially in prototypes.  It makes it a lot easier to troubleshoot when something doesn’t work like expected.  Be consistent in the color codes as it will pay off if you do several projects. 


Additional Considerations

1.  Take your time in the design and layout planning phase.  A poor design or poor layout will seriously degrade the end device.   I spend more time in design and layout than in building by a factor of 10 or more.

2.  Take your time in building the project.  Poor construction technique has ruined lots of projects.

3.  I like to use DC on tube heaters.  The less AC running around in a chassis the better (quieter).  If you must use AC on the heaters, be sure to tightly twist the wires together.  Use bypass capacitors (often called a snubber) on the heaters.  I usually put one on each tube right at the socket.

4.  I like to use a IEC AC receptacle.  The types I prefer to use have EMI/RFI line filters and sometimes the fuse all in one neat package.

5.  Include a power indicator light.  LEDs are great for this.  Since tube equipment takes some time to warm up and even then it is not always obvious it is turned on an indicator is quite handy.

6.  Build the project with the thought in mind that you may want to modify or service it later.  Test points are handy to verification proper operation.

7.  Check the wiring carefully when you are finished the building process.

8.  I like to use a ground fault protected outlet (GFCI) when first powering up a new project.  Getting zapped by your project is no fun.

9.  Check all voltages when you are convinced the project is functioning.

10.  If all is not working properly, seek help.  Both individuals and DIY audio discussion forums are quite valuable in the resolution of problems.

11. Relax and enjoy with satisfaction the project you built yourself.

Good Listening
Bruce Heran


Related Articles: