30 November 2009

KT88 Push-Pull Monoblock Tube Amp Kits

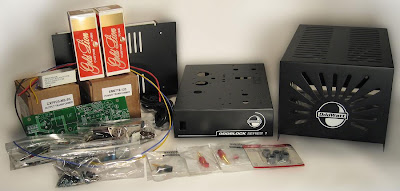
Back in the summer I purchased a pair of the new OddWatt monoblock KT88 vacuum tube amplifier kits. A photograph showing the contents of the tube amp kit is shown below.

DIY KT88 Push-Pull Monoblock Tube Amp Kit
The amplifier circuit is very simple and there are a minimal number of parts in the signal path. The input stage uses a 5751 dual triode in a Shunt-Regulated Push-Pull (SRPP) circuit. The output stage is a Self Inverting Push-Pull (SIPP) amplifier that uses KT88 power tubes. A constant current source (CCS) is used to force the output stage into class-A operation. The power supply is solid-state and there is a turn-on delay. The audio output transformers as well as the power transformers are from Edcor Electronics. The tube amp kit comes complete with a black powder coated steel chassis that includes a ventilated cover for safety. Following the thorough instructions provided with the tube amplifier kit construction of the amp was very straightforward and the kit went together without any difficult. The photo below shows the finished KT88 monoblock tube amplifier kits in use.


Shown in the photograph are the two monoblock KT88 tube amplifier kits, a NAD C521i cd-player, a Behringer SRC2494 used as an up-converting DAC and a DIY Lightspeed attenuator.

The tube amp kits have been in use for about 3 months now and I am very pleased with the monoblock amps. For a detailed review of the tube amp kits and additional notes on the construction of the kit, see the DIY monoblock KT88 Push-Pull Tube Amplifier Kit page.

Additional OddWatt Audio Amplifier Information

What's Playing: Monty Alexander - The Good Life

19 November 2009

DIY Vacuum Tube Prototyping Board

by Bruce Heran USA Flag To email Bruce, type out the email address.

DIY Valve Prototyping Board
This is a project that I made to take care of an ever increasing need to prototype vacuum tube (valve) circuits. As you c
an see from the photos, it really is a test “board”. I do a lot of work with tubes and love to design and improve circuits. In the process I often use various CAD type programs to rough out the designs. I have frequently found that the models do not agree with the final build. Some are right on, but most are off enough to turn a good idea into a waste of time. Thus the need to quickly prototype designs. Now I could have created this board with many additional features - speakers, output transformers, LEDs... But what I needed was a simple way to test single stage tube circuits. So for simplicity I wired the tube pins together (pin 1 to pin 1 and so on). The leads from the pins are brought out to terminals on a “Euro” style terminal strip. I included several other “Euro” strips, a pair of RCA jacks, a 100 k-ohm variable resistor and solderless prototype breadboard. This solderless breadboard is available in various sizes from several sources. If you build one of these boards, feel free to use the idea to adapt it to your needs and use whatever parts you so desire.

DIY Valve Prototyping Board Underside
The hardest part of the build was deciding on the layout of parts. I tried t
o figure out what kinds of parts would be connected to the various tube pins and place the terminal strips in locations where they would make it easy to swap parts in and out of circuits.

DIY Vacuum Tube Prototyping Board
You will certainly notice that there is no power on the board. I have several external variable power supplies and decided they would be fine for prototyping. No need to reinvent the wheel. With a larger board you could easily add power supplies if you desired.

Good listening, Bruce


More DIY Audio Prototyping Tools

14 November 2009

Elekit Single-Ended 6L6 Tube Amp Kit

A little over a month ago TubeDepot added the OddWatt Audio KT77 monobloc tube amp kits to their growing line-up of HiFi tube amp kits and they have just added another. Their new tube amp kit is the single-ended Elekit TU-879S Stereo Tube Amplifier Kit which is available for $599.95US (November 2009).

From the TubeDepot OddBlock Elekit TU-879S Stereo Tube Amplifier Kit page:

With a simple, clean design this Elekit TU-879S single-ended, class-A vacuum tube amplifier kit echoes past greats like the Japanese made Audio Note Ongaku. Supplied with EH 6L6 tubes, this versatile amplifier is able to handle just about any octal based power tube on the current production market. We have tried it with JJ KT77, EH 6L6, Sovtek 6550 and SED KT88. They all sound great, but we favor the SED KT88 for its robust power and overall balanced tone. What’s even better is that you can download a highly detailed, easy to follow assembly manual. In just a few nights, you can be listening to some of the best audio you can imagine.


Elekit TU-879S 6L6 Tube Amp Kit Parts
Elekit TU-879S 6L6 Tube Amplifier Kit
As evident from the photographs, the Elekit TU-879S Stereo Tube Amplifier Kit is a complete tube amplifier kit which includes a clean and functional enclosure. The power transformer is a thin R-Core type produced by
Kitamura Kiden.

For those of you who like rolling tubes this kit will give you plenty of options between the 6L6 / KT66 / 5881, EL34 / KT77 and KT88 families of tubes. A comprehensive instruction manual which includes the schematic is available if you would like to have a closer look.

Link to the kit: Elekit TU-879S Stereo Tube Amplifier Kit

More Tube Amplifier Kits

19 October 2009

Class-A EL84 (6BQ5) Push-Pull Tube Amp

Bruce Heran of OddWatt Audio has shared another of his great sounding OddWatt amplifier designs with the DIY community. His latest amplifier project shares a similar topology with the other OddWatt tube amplifier projects available on the DIY Audio Projects website. His latest project is similar to the first Push-Pull EL84 (6BQ5) Oddwatt project posted two years ago. Both of the tube amp projects use EL84 (6BQ5) vacuum tubes in the output stage. The first OddWatt amplifier used a ECC802S SRPP driver stage while this one uses a 5751 SRPP driver stage. The main difference between the two amps is that this one uses smaller Edcor audio output transformers making it easier and less costly to build. A photo of the finished amplifier project is shown below (click on the photo for an enlargement).

5751 SRPP - EL84 (6BQ5) Push-Pull Tube Amp
There are a number of improvements to the circuit. With the 5751 driver stage the higher gain of the new tube amp will allow for direct connection of portable MP3 players. The amplifier will produce about 5 to 7 watts of high quality sound with good performance between about 25 Hz to beyond 20kHz.
The new amplifier measures very well and Bruce reports that the amp sounds very good with clean, detailed mids and highs and a great sound stage. Complete details for this project are available from the 5751 SRPP / EL84 (6BQ5) Push-Pull DIY Tube Amplifier project page.

Related OddWatt Audio Amplifier Information
What's Playing: The Pretenders - Kid

29 September 2009

OddWatt Tube Amp Kits now at TubeDepot

Update (30 November 2009) - see our review of the DIY KT88 Push-Pull Monoblock Tube Amp Kits.

Bruce and Rodney from OddWattAudio.com sent us an email to let us know that their OddBlock tube amplifier kits are now also available from TubeDepot for $599 (September 2009).

From the TubeDepot OddBlock kit page:
The OddWatt ODDBLOCK amplifier kits... great sounding amps at an affordable price. These all tube, single channel, class "A" amplifier kits are designed to be big in performance without breaking the bank.
Running in pure class "A" operation, and utilizing a constant current source circuit embedded in the Ultra-Linear output stage, once built these amps will comfortably provide the lowest noise, lowest distortion with maximum musical bandwidth. Thus allowing you, the listener to enjoy the music free of interference from the equipment. Hear more of the music and less of the gear.
Each kit comes with a matched pair of JJ KT77 and 1 JAN 5751.

OddBlock KT77 Tube Amp Kit Parts

OddBlock KT77 Tube Amp Kit
As can be seen from the photos, this is a complete tube amplifier kit which include a nice powder coated enclosure. For those of you with pets or small children, the enclosure also includes a removable vented top to keep those little paws and hands away from the hot vacuum tubes.


OddBlock KT77 Tube Amp Cover
I put together a pair of the OddBlock kits and have been enjoying them for about a month now. The tube compliment on my set is JAN 5751 and Genalex - Gold Lion KT88. I'll get more details of my kit build posted in the near future.

Link to the kits: 5751/KT77 OddBlocks @ TubeDepot


DIY OddWatt Amplifier Projects

What's Playing: Xiomara - Xiomara

08 September 2009

Push-Pull Compactron Amp using TV Tubes

Pete Millett has a new Hi-Fi vacuum tube amplifier project on his website which is refereed to as: The "Engineer's Amplifier" - a distortion canceling push-pull amp using cheap TV tubes (!). The amplifier consists of a 2-stage push-pull pentode design that puts out a little under 20 Watts. The driver stage uses a pair of 6CB6 pentodes in a differential amp configuration with a ICP10M45S CCS. The output stage uses compactron TV sweep tubes (6JN6 or 6JM6 / 6GV5). The output bias is set so that the amp remains in class A1 operation until about 10 watts where it enters class AB1.

6JN6 / 6JM6 / 6GV5 Compactron Push Pull Tube Amp
A solid state power supply comprised of silicon rectifiers and a MOSFET ripple filter with no chokes which helps keeps cost down. The power transformers and audio output transformers are from Edcor who make great quality iron at a reasonable price.

Compactron Push-Pull Hi-Fi Vacuum Tube Amplifier
As you can see, this will not be a simple amplifier to construct using point-to-point techniques. Fortunately Pete is selling printed circuit boards on eBay for $50US (September 2009) - search eBay for "The Engineer's Amplifier" or user: pmillett.

Full details for Pete's latest project the DCPP Amp are available on his website.

More Push-Pull Tube Amplifier Projects:
What's Playing: The Coryells - Funky Waltz

05 September 2009

High-End Audiophile Headphone Amplifier

Kelvyn Shaw in the UK sent us a note with a link to his latest DIY Audio Project - a High-End Headphone Amplifier. The headphone amp is made using only premium components and built around the National Semiconductor LME49710 high-performance Hi-Fi operational amplifier which is noted as costing 20 times more than your typical op-amp.

DIY High-End Headphone Amplifier PCB
LME49710 Headphone Amplifier
Kelvyn notes that the amplifier "Uses only the finest audiophile quality components that have been carefully selected with no expense spared". Power is supplied through a regulated dual rail power supply using a low noise toroidal transformer. The amplifier is housed in a black anodized aluminum enclosure with a heavy duty clear anodized aluminum front panel. An Alps Blue Velvet potentiometer is used for the volume control.
DIY High-End Headphone Amplifier
LME49710 Headphone Amplifier
DIY Audiophile Headphone Amplifier
Finished LME49710 Headphone Amplifier
From the BOM, the cost of the headphone amplifier is about £163 which is about $265US (4 Sept 2009). This is an advanced DIY project but for those who are are to the challenge, all the necessary information (schematic, BOM, PCB gerber data and enclosure panel drawings) to build one for yourself is available from Kelvyn's website KS Projects - Headphone Amplifier along with several construction photos. Nice work and enjoy your headamp.

More DIY Headphone Amplifier Projects:

What's Playing: Joni Mitchell - Wild Things Run Fast

24 August 2009

6418 Sub-miniature Tube Preamp / Headphone Amp

We often get questions asking about suitable vacuum tube (valve) kits for beginners or first time DIYers. Aside from the fact that vacuum tube audio kits are generally expensive, there is also the safety concern that most tube circuits operate with potentially lethal voltages. Mark in Australia found the following 6418 tube preamplifier and headphone amp kit which is an exception - it is inexpensive and can operate from single 9V battery.

6418 sub-mini Tube Preamp / Head Amp Kit
The tube preamp / headamp kit is from Oatley Electronics in New South Wales Australia and based around the Raytheon JAN6418 sub-miniature valve (tube) and an IC. The K272 Stereo Tube Preamplifier – Headphone Driver kit cost $27AU (~$23US – August 2009). The kit is complete including a printed circuit board (PCB) which makes for easy assembly but you will need to provide your own enclosure. The kit only consumes about 12mA at 9V and can be powered with a single 9V battery making this a safe and ideal kit for those who are new to vacuum tube electronics.

6418 Tube Preamp / Headphone Amp Kit

The photo above is a build of the kit using the supplied parts. Since the 6418 tube are extremely microphonic and will "ring" if they are subjected to vibrations rubber grommets are used to help damp the tubes. Mark has built a number of these kits now including a few with upgraded parts (metal film resistors, polypropylene film inter-stage capacitors and a Burr-Brown OPA2134 op-amp). The photo below is a tube preamp in a plastic ABS enclosure using the kit and upgraded components.

6418 Tube Preamplifier Kit
Mark reports that the kit performs well and sounds good. The bandwidth is very wide, the -3dB points are 10Hz and 50kHz. As a preamp there is good depth, wide breadth and sharp detail revealing fine recorded detail with no hard edges. The photo below shows the kit in a plastic enclosure being used as a portable headphone amplifier.

6418 Tube Headphone Amplifier Kit

The tube preamp / headamp kit from Oatley Electronics is well worth the $27AU price tag. For complete project details and more variations see the project page for the 6418 Tube (valve) Preamplifier / Headphone Amp Kit.

Additional Tube Headphone Amplifier Projects:


What's Playing
: Roy Orbison - Shahdaroba

05 July 2009

Hi-Fi Chip Amplifier (chipamp) with TDA2050

Thomas from Germany has put together a build log of his recent DIY TDA2050 Hi-Fi Chip Amplifier (chipamp) build. The chipamp project is built around a single chip - the TDA2050V integrated circuit (IC) which is produced by STMicroelectronics. The TDA2050 chip is capable of producing about 25W of output into 8 ohms with 24V power supply rails. Like most chipamp projects, the circuit is very simple and can easily be constructed on perfboards.

TDA2050 Chipamp Circuit on a Perfboard
The power supply is also constructed on a perfboard. For the power supply Thomas uses a 120VA torroidal transformer with dual 18V secondaries and generally followed the "snubberized" Gainclone power supply design by CarlosFM with 10,000 uF per rail.

DIY TDA2050 Mini Gainclone Chipamp

For the enclosure Thomas used a Hammond satin black steel 12" x 8" x 3" chassis (Model 1441-24). The amplifier controls including a headphone output are on the front.

Finished DIY TDA2050 Chipamp

Thomas reports that the chipamp produces very good sound and that the small amp can hold it own against various high quality amplifiers that he has used. For complete project details, see the DIY TDA2050 Hi-Fi Chip Amplifier (chipamp) page.

These chipamps are simple to build, low-cost and when properly implemented can deliver very good fidelity. If you are looking for a project to try out, give one a try.

Additional Chipamp / Gainclone Projects:
What's Playing: Natalie Mechant - San Adreas Fault

14 June 2009

Prototype Boards for DIP Chips (op-amps)

There are several printed circuit board (PCB) manufactures who cater to hobbyists by offering small quantity orders of PCBs. Some of the larger manufacturers offer free PCB design software that makes it very simple to come up with your own PCB designs. This is all great until you see the price estimate for that pair of simple boards can be in the order of $50 to $100US. Well, when I am spending that much money on parts it is generally for vacuum tubes, an enclosure or perhaps a transformer - a simple PCB, no thanks! Fortunately for simple circuits a prototype board (protoboard) will often suffice and they are generally inexpensive and commonly available. This post examines some of the low cost protoboards that are available for use with an integrated circuit (IC) that comes in a dual in-line package (DIP) - such as an operational amplifier (op-amp).

The noted costs are from 15 June 2009
Dual General-Purpose IC PC Board - Radio Shack 276-159 - ($2.49US)
This general purpose board is perforated and can be split into two pieces. Each piece will accept up to a DIP20 package or a couple of smaller DIPs can be fit on a board. The overall dimensions
Radio Shack 276-159 Protoboardare 1-3/4" x 3-3/8" and when split apart each board measures 1-3/4" x 1-3/4".

The board is constructed from phenolic which is generally flimsy, but given the small size of the boards that is not an issue. Be careful when mounting using the screw holes as it is easy to break a corner off the board. The board is easy to work with but the small size will limit it to small projects. One problem with the board is that the solder pads are fairly thin and as a result with rarely survive desoldering and re-soldering if you need to make changes to the circuit.

What is nice about the boards is that they are often locally available and their low cost. The boards are available from Radio Shack in the US for $2.49US:
Here are a couple of DIY Audio Projects that use the boards:

Multi-Purpose PC Board - Radio Shack 276-150 - ($1.99US / $4.99CDN / $2.96AU)
The Radio Shack 276-150 is a popular multi-purpose protoboard. The overall dimensions of the protoboard are 1-7/8" x 2-7/8" (48 x 73 mm). There are 417 holes on the board and up to a DIP50 Radio Shack 276-150 Protoboardpackage or a few smaller ones can be fit on the board. Two traces run down the center of the board which can be used for grounding or power rails.

Like the previous Radio Shack protoboard it is also constructed from phenolic. On the 276-150 board the mounting screws are very close to the edge and it is very easy to break a corner off. Also, the solder pads are thin and will lift off the board if too much heat is applied. The boards are a good size and very easy to work with. There is plenty of space to get three DIP8 op-amps on a board.

These boards are very common and available in the US ($1.99US) , Canada ($4.99CDN) and Australia ($2.69AU):
DIY Audio Projects that use these boards:

D-4 Prototype Board - audioXpress PCBD-4 - ($4US)
Darren of DH Labs was kind enough to send us a sample of his prototype board design. The board measures about 2-1/4" x 3-1/4" and can hold a DIP50 package with space DH Labs D-4 Prototype Boardleft over. A ground trace runs down the center of the board and there are also two power supply traces on either side. The board is constructed from fiberglass and the pads are tinned.

With
the ground and power traces the D-4 Prototype Board is ideal for use with op-amps. There is plenty of room to fit up to four DIP8 packages on the board. The fiberglass construction and distance of the mounting screws from the edge make it unlikely that the corners will break off when mounting. The soldering pads are fairly durable and will survive desoldering and re-soldering if you need to make circuit changes. Considering the cost of the 276-150 boards in Canada, the switch to the D-4 boards is an easy one for me.

The D-4 Prototype Board is available online through audioXpress ($4US):
The photo below is a DIY Phono Preamplifier that Darren put together using the board.

DH Labs D-4 Prototype Board
Please let us know if you have a favorite protoboard that you use with op-amps.


What's Playing: Rebecca Pidgeon - Grandmother

08 June 2009

OddWatt Audio - Tube Amplifier Kits

Update (30 November 2009) - see our review of the DIY KT88 Push-Pull Monoblock Tube Amp Kit.

Our friends Bruce and Rodney sent a message informing us that their website - OddWattAudio.com is now active and that it should be fully functional in the next few days or so. Some of you will will recognize the term "OddWatt" which is the name Bruce gave to his scalable push-pull amplifier projects. The DIY versions of the OddWatt tube amplifiers are documented on the DIY Audio Projects website and are listed below.
The OddWatt tube amplifier project pages provide full details of the amplifiers as well as instructions on how to build the amplifier.

The OddWatt circuit is failry simple and consists of a SRPP driver stage which feeds a self-inverting push-pull (SIPP) output stage. The output stage operates only in Class-A mode and the bias is set using a LM317HV regulator that is configured as a constant current source (CCS).

Currently OddWattAudio.com is offering KT77 and KT88 OddWatt amplifier kits as mono-blocks. However, their website indicates that stereo EL84 OddWatt kits should be ready around July. The OddWatt site also indicates that a stereo preamplifier and a headphone amplifier kit may be available in the future. Photographs of the KT77 and KT88 tube amp kits are shown below.

OddWatt - OddBlock KT77 Push-Pull DIY Tube Amplifier Kit PartsPhotograph 1: OddWatt - OddBlock KT77 Push-Pull DIY Tube Amplifier Kit Parts


OddWatt - OddBlock KT88 Push-Pull DIY Tube Amplifier Kit Parts
Photograph 2: OddWatt - OddBlock KT88 Push-Pull DIY Tube Amplifier Kit Parts

The photos below show a the finished OddWatt KT77 and KT88 tube amplifier kits.

OddWatt / OddBlock KT77 Push-Pull DIY Tube Amplifier Kit

Photograph 3: OddWatt Audio - OddBlock KT77 Push-Pull DIY Tube Amplifier Kit


OddWatt Audio - OddBlock KT88 Push-Pull DIY Tube Amplifier Kit

Photograph 4: OddWatt Audio - OddBlock KT88 Push-Pull DIY Tube Amplifier Kit


OddWatt / OddBlock KT88 Push-Pull DIY Tube Amplifier Kits

Photograph 5: OddWatt Audio - OddBlock KT88 Push-Pull DIY Tube Amplifier Kit


The finished mono-block kits look great. Based on the information on the site, the kit comes complete with all the parts required to build the amplifier. I've been meaning to build an OddWatt amplifier for some time now so the timing was good and I placed an order for a pair of KT88 mono-blocks last week. My kits should arrive in the next few days. When they do arrive I'll post an update complete with photographs.

Cheers,
Gio

Update (29 September 2009) - OddWatt Tube Amp Kits now available at TubeDepot

What's Playing: Tracy Chapman - Give Me One Reason

19 May 2009

DIY Hi-Fi Cable Projects

We have added a few new DIY Hi-Fi Audio Cable Projects to the main website.  Here is a quick summary of the new cable projects.
Belden 89259 RCA Interconnect Cables
Belden 89259 Interconnect Cables

DIY RCA Interconnect Cables with Belden 89259 Coax
A couple of weeks back we added detailed instructions that were put together by our friends at auDIYo.com to construct the popular Belden 89259 line-level RCA interconnect cable design by Jon Risch. The cables are a simple unbalanced RCA interconnect cable design that uses the high-quality and low capacitance Belden 89259 coaxial cable. Through the use of TechFlex
Expandable Sleeving, shrink wrap and good male RCA plugs, a novice can put together a very nice looking set of Hi-Fi interconnect cables that will deliver the performance and not set you back a few hundred dollars. For full details, see the Belden 89259 DIY RCA Interconnect Cable project page. The photo below are DIY Belden 89259 RCA Cables put together by Paul from Kent, UK. Click the image to enlarge.

Cross-Connected Belden 89259 DIY Hi-Fi Speaker Cables
Using the same Belden 89259 coaxial cable as in the project above, step-by-step Instructions are also available outlining the construction of Cross-Connected Belden 89259 DIY Speaker Cables.  The cross-connected speaker wire design is also by Jon Risch.  For full instructions outlining the assembly process, see the Cross-Connected Belden 89259 DIY Hi-Fi Speaker Cables project page.

DIY Low-Inductance Speaker Cables
We have also added instructions to construct simple DIY low-inductance speaker cables. Adam has put together these fine looking speaker cables for his DIY 3-Way Hi-Vi Tower Loudspeakers. The cables are very simple to construct and consist of plain 16 gauge wire that is twisted together in alternating directions. The alternating cable geometry results in a speaker cable that has a very low-inductance and the equivalent wire gauge 10 and thus the cable resistance is also low. For that Hi-Fi finish, Adam uses a set of high-quality gold plated banana plugs, TechFlex Expandable Sleeving and a custom laser etched decorative oak sleeve. The results are a sharp looking speaker cable that rivals the performance of commercial speaker cables at a fraction of the cost. For full instructions, see the Low-Inductance DIY Speaker Cable
page.

Low-Inductance DIY Speaker Cables
DIY Low-Inductance Speaker Cables

More DIY Cable Projects
What's Playing: Roy Orbison - In Dreams (live)

16 May 2009

Coldplay - Left Right Left Right Left [2009]

While not DIY, I thought I would let you guys know that Coldplay is offering a free album download.

Quote from Coldplay.com:
"... The free download of Coldplay's new live album, LeftRightLeftRightLeft, is now available here on Coldplay.com ...

Today [May 15, 2009] is also the day of the band's first North American tour date, in West Palm Beach, where the first copies of the LRLRL CD will be given away.

The CD will then be handed out to all fans at every remaining Coldplay live show in 2009 (apart from Festival shows). The free download will also be available from Coldplay.com until the band play their final 2009 show."

The download is a 54.5MB .ZIP archive containing 9 .MP3 tracks which are recorded live. The MP3 tracks are 192 kbps and sure they are not the pinnacle of sound reproduction, but it's music
and FREE.

Here is the link to download Coldplay's Left Right Left Right Left live album [54.5 MB].

Track Listing:
  1. Glass of Water [4:43]
  2. 42 [4:52]
  3. Clocks [4:40]
  4. Strawberry Swing [4:16]
  5. The Hardest Part / Postcards from Far Away [4:15]
  6. Viva La Vida [5:24]
  7. Death Will Never Conquer [1:39]
  8. Fix You [5:38]
  9. Death And All His Friends [4:22]

The images of the album cover are and a screen shot of the track information is included below. Click on the images to enlarge them.

Coldplay - LeftRightLeftRightLeft - Front Album Cover Art

Coldplay - LeftRightLeftRightLeft - Back Album Cover Art

What's Playing: Coldplay - 42 (mp3)

11 May 2009

DIY Lightspeed Passive Attenuator

Alps Blue Velvet, Bournes, TKD, Alps Black Beauty, DACT Stepped Attenuators ... If you are familiar with some of these names, you likely have an interest in high quality passive attenuators and you should continue reading. The noted items have a few things in common - first off, they are potentiometers that are often used as attenuators or volume controls in audio equipment. As a volume control, they also have another thing in common - they all used some form of "contact point" to attenuate audio signals. In the case of a potentiometer, this is typically a "wiper" which slides along a conductive material forming an adjustable voltage divider. If you are passionate about audio reproduction, you are fully aware that these "contacts points" can be the source of unwanted noise. Now it certainly does not make sense to spend money on high quality interconnect cables only to run the signal through a dirty potentiometer that you infrequently spray with with a contact cleaner like Deoxit.

When people talk about the "sound of capacitors" someone will inevitably say that the best sounding capacitor is "no capacitor" - that is if it can be eliminated. So following that principle, one could argue that the best sounding attenuator is one with no contact points in the signal path. Enter the Lightspeed Passive Attenuator.

The Lightspeed Passive Attenuator uses optocouplers to establish the level control and this is done with no "contact points" through the attenuator. The optocoupler is a LED and Light Dependent Resistor (LDR) is one housing. The operation principle of the Lightspeed is simple - by adjusting the intensity of the LED you can change the resistance of the LDR. By using a series and shunt combination of matched optocouplers the attenuator produces a constant input and output impedance, regardless of where the voltage control setting is. Hmmm, an attenuator with constant input / output impedance and no contacts points - great idea!

Lightspeed Passive Attenuator
Uriah has put together a detailed set of instructions to build a DIY Lightspeed Passive Attenuator. I've built one of the attenuators for myself (photo below) and I think it's great! It is a remarkable improvement over all the passive potentiometers that I have tried. The attenuator is very simple to build, so if you have an interest in higher quality volume controls take a look at the instructions.


The attenuator design could easily be scaled upward to include support for multiple channels and used as an effective way of controlling several of channels for a Home Theater setup. For full information, see the DIY Lightspeed Passive Attenuator.

What's Playing: Marta Gomez - Canta

13 April 2009

Simple DIY Monitor Speakers

We recently received an email asking for some clarification about the difference between line-level and speaker-level Baffle Step Correction Circuits with a reference to the DIY S.E.Xy Speaker Project over at Bottlehead.com. This message brought our attention to a very simple speaker project that we thought we would point out to our readers. A photograph of the S.E.Xy Speaker Project is shown below.

Bottlehead.com Fostex FE166E S.E.Xy Speakers
In short, the small sealed monitor speakers are comprised of inexpensive Fostex FE166E fullrange drivers and housed in prefabricated Dayton Audio 0.25 ft^3 cabinets from Parts Express. This is a very simple speaker project and the only woodworking required is a couple of holes through the front baffles for the drivers (electric drill and a hole saw should do).

What caught my attention with this project was the fact that the 6.5" Fostex drivers actually fit in the small prefabricated speaker cabinets. While I have used the great looking Dayton Audio speaker cabinets in the past, I never bothered to check if the 6.5" Fostex drivers would fit.

Fostex FE166E vs FE167E
Of course some of you may prefer to use the Fostex FE167E fullrange speaker driver in place of the FE166E and that should not pose any issues. The FE167E has the same efficiency of 94dB but with it's higher Qts it will be able to produce more bottom-end which will allow you to lower the crossover point and possibly even allow you to get away with just one subwoofer. The figure below shows the modelled frequency response of the two drivers in a 0.25 ft^3 sealed enclosure.

Fostex FE166E and FE167E in a Sealed Speaker Box
The modelled response shown above uses the T/S Parameters noted on the Fostex data sheets. However, based on our experience with measured T/S Parameters from other Fostex drivers, expect Qts to be a little larger than noted on the data sheet. This means that we can expect a little more bass than what is shown on the plot. In addition to getting more bass out of the FE167E, you may also prefer it as it does not exhibit the rising frequency response of the FE166E which some may find too shouty.

Baffle Step Compensation: Line-level vs Speaker-level
This speaker project was meant for use with the 2W Bottlehead Single Ended eXperimenter's amplifier and therefore Line-level Baffle Step Compensation is the most practical choice as it won't waste the precious power of small tube amps. If power is not a concern, you can use the Baffle Step Circuit Calculator to come up with suitable speaker-level circuit.

For those wondering about the line-level BSC I have run a couple of simulations. I did not know the input impedance of the Single Ended eXperimenter's tube amp so I assumed 100k-ohms.

Line-level Baffle Step Compensation (BSC)
It would be a good idea to try the BSC on a protoboard and adjust the values to suit your room and personal taste. I would start without the 1.2nF (0.0012uF) capacitor, especially with the FE166E.

The inexpensive Fostex drivers work well in sealed enclosures. I am still very happy with my Sealed Fostex FE127E Bipole Speakers. For those of you afraid of woodworking, the prefabricated Dayton Audio cabinets are for you. Also, for the time being PartsExpress is offering free shipping on most orders over $98 (limited to USA).

Parts Express - Free Shipping Offer


More DIY Bookshelf Speaker Projects:
What's Playing: Emilie Mover - That Song