Showing posts with label preamplifier. Show all posts

15 December 2013

4S Universal Preamplifier for 12A_7 Tubes

The 4S Universal preamp is a Super Simple Single Stage (4S) line stage preamp that works well with the entire range of 12A_7 tubes - 12AU7, 12AV7, 12AY7, 12AT7, 12AZ7, and 12AX7. You can change the tube type to vary the gain of the preamplifier by quite a large margin. 

4S Universal Preamp for 12A_7 Tubes
The preamp uses a 6CA4 tube rectified power supply which is very quiet. The preamplifier is built using point-to-point construction techniques and into a die cast aluminum enclosure from Pomona.  The attenuation control is on the output of the preamp.

4S Universal Preamp with 6V6 Lacewood Amp
The 4S Universal is a preamp that can be adapted to the task at hand simply by swapping tubes. It also allows some tube rolling to compare various tubes in your stash. The 4S Universal preamp is a great little unit to really bring out the most in your power amps.  For full details see the 4S Universal Preamplifier Project pageComments and questions about this project are welcome in the 4S Universal Tube Preamp Project (12A*7) thread.

Super Simple Single Stage (4S) preamp with Genalex Gold Lion 12AU7
The photo above is one of Mark's Super Simple Single Stage (4S) preamplifier builds.  For more information see Mark's 4S Universal Preamplifier for 12A?7 Valves.

25 June 2012

DIY Stepped Attenuator Volume Control

The latest project to be added to the site is a DIY passive volume control which is made using a switched attenuator.  A stepped attenuator operates by switching to different resistors at each of switch settings.  The benefit of a stepped attenuator is that it can use low noise metal film resistors making them quieter than typical hot formed carbon and conductive plastic potentiometers.  The volume control uses a stereo 100k 24-position stepped attenuator which comes fully assembled for $18US from 8 Audio-Mall.  The attenuator uses 1% precision metal film resistors on a "make before break" multi-position switch.  A photo of the stepped attenuator is shown below. 

stereo 100k  24-position stepped attenuator
stereo 100k  24-position stepped attenuator
The stepped attenuator is housed in a small wooden enclosure with aluminum top and bottom plates.  A knob, RCA jacks and a 4 Pole Double Throw (4PDT) switch round out the DIY volume control.

DIY Stepped Attenuator Volume Control
Matt reports that he is pleased with the results of the stepped attenuator volume control as it is significantly quieter than any of the carbon and conductive plastic potentiometer he has used.  The attenuator was measured to have a noise figure which is about 26dB lower than a typical PEC hot molded carbon potentiometer of the same value.  For full project details, see the DIY Switched (Stepped) Attenuator Passive Volume Control project page.


More DIY Volume Controls

22 November 2011

Informal Comparison of Six Phono Preamps

This is a project that sort of evolved from an interest to see how good a particular phonograph preamplifier was. Not the one I designed, but one from a DIY kit. If I would have known how difficult and possibly inconclusive it would become, I might have not done it. As it was, the experience was valuable in several ways. First let it be clear in everyone’s mind that this comparison is largely subjective and based on what I hear or can measure. It was concerned with only those preamps that I had available at the time and your thoughts and results could be quite different. The comparison demonstrated that without a top notch system nearly any preamp might be OK. The flip side was also true that in a top notch system, many preamps would be unacceptable. Another thing that came from the listening and testing is that compliance with RIAA equalization varies from company to company but in many cases might not be audible. My method for comparison had two parts. The first was to listen to various selections of music with each preamp and then score them on various things I felt meaningful. The second was to check various parameters with my test gear. The following six phonograph preamps were the ones compared:
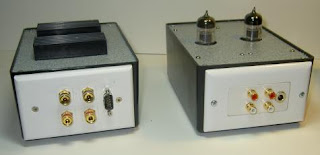
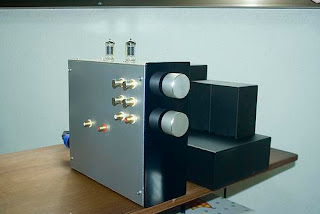
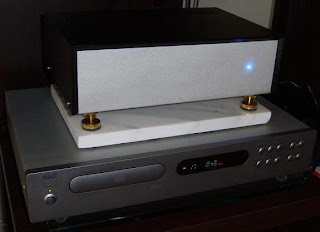
Left top, Moon LP3, left middle TC 750, left bottom Jaycar KC5433,
Right top, Groove, right middle K303, right bottom DH101
General
The various phonograph preamps cover a wide range of designs and prices. The lowest cost ones are approximately $50 (TC750) and the most costly more than 10 times as much (LP3). One has an undetermined price at this time (Groove) and is likely to be above the upper end of the group even in kit form. Design variations range from entirely IC to all tube. Some use single ended configurations on the active devices, one uses fully complementary differential style (DH101) and one SRPP (Groove). All are designed as stand alone devices with the exception of the DH101 which is a complete preamp. All are MM/MI compatible with the LP3 also covering MC applications. All, but one, are solid state devices. There will be two phases, bench testing and listening.

Equipment Used For The Listening Portion 
  • Pro-ject Debut III turntable with acrylic platter and Speedbox 
  • Dynavector 10X5 high output MC cartridge (re-tipped with ruby cantilever by Sound Smith) 
  • 80-Step Passive preamp (1% precision resistors) 
  • Oddwatt KT88 Monoblock valve power amplifiers 
  • Martin Logan Vista electrostatic speakers (operating full range) 
  • Marchand electronic crossover (50 Hz low pass / 24 dB per octave to subs only) 
  • AudioSource Amp 100 dual 50 watt RMS solid state power amplifier (for the sub) 
  • Custom designed 7 cubic foot subwoofers, 15" drivers (F3 = 22 Hz) 
  • APC H10 AC line power conditioner
Listening Tests
Listening tests were performed first to avoid prejudging performance based on what the test measurements might indicate. Music selections consisted of new and older records. The music selected was varied and covered a wide range of genre. Different selections might have provided different results, but I tried to span a wide range. There were acoustic stringed instruments, male and female vocals (duets too), classic rock music, music with keyboards, solo jazz singers and big band. Each preamplifier was played in turn with the order mixed up with the same selection.

The listening performance was subjective and the various ratings are solely those of the tester. Scoring was as follows: Numeric grade of 1 to 10 with 10 being the best. 10 = among the best I have ever heard, 8 = excellent performance, 6 = average performance, 5 = minor deficiencies, below 5 increasing levels of unsatisfactory performance. Areas rated were: Signal to noise – both hum and / or background noise (only in bench testing unless one is obviously deficient during the listening tests), treble response, mid range response, base response, image centering, low level detail, sound stage width, and overall involvement of the sound.
(click to enlarge)
(click to enlarge)
(click to enlarge)
Listening Test Results
It seems that price and to a certain degree complexity matters. The three most pricy or complex designs were clearly better than the lower cost three. All of the top three excelled in some areas. There is a different flavor to each that shows up in how they rendered the different musical tracks. The Groove was a clear standout in the bass region. Solid, deep and well controlled bass was noted in all cases. Other preamps occasionally got into the sub 50 Hertz range, but none with such authority. The LP3 was second in this area and was clean and well controlled, but not nearly as authoritative. The DH101 had deeper bass than the LP3, but it was not as clean and well controlled. At the opposite end of the range, the LP3 had a slight edge on all others in treble presentation. The Groove was a close second and often they were tied. In the areas of inner detail, imaging and sound stage width the differences were often linked to the particular music being reproduced. It was largely a toss up between the LP3 and Groove with the edge going to the Groove. The primary difference between the top two preamps is one of flavor. The LP3 has a crisp clean leaning toward neutral sound and the Groove a warmer more delicate sound. Either would be satisfactory in many systems. The DH101 fell slightly short of the performance of the top two, but was in most areas a rather nice sounding preamp. The three preamps in the “budget” category were sort of a mixed bunch. They clearly were in a different category from the top performers. In some cases they would be good entry level preamps for someone just starting in vinyl. The TC750 even with upgraded components was at the bottom of the group. It performed in what I would generally characterize as less than average manner. It really has no place in a quality system. The other two (Jaycar KC5433 and the K303) are fairly well matched. Each is slightly above the average level, but well short of the top performers. Generally their shortcomings were by omission and not commission. They are characterized by things such as less detail, less response in various parts of the spectrum and the like. They did exhibit some sibilants and edgy sounding behavior on various selections, but were mostly listenable. I felt that the level of listening involvement suffered from the omissions. I would not recommend them for use in systems above the rather modest level. It must be noted that the two are diy kit based and low cost and would not be expected to compete in the same arena as the top performers. For entry level systems they might be a reasonable option. The K303 has two gain options and the recommended setting (less gain) resulted in an output significantly below all the other preamps. I changed the setting to the higher level and the output them was approximately equal to the other preamps.
(click to enlarge)
(click to enlarge)
Equipment For The Bench Testing
  • HP 331A distortion analyzer
  • Velleman PCSD 1000 PC based digital storage oscilloscope
  • Tenma  digital storage oscilloscope
  • Tenma precision signal generator
  • Circuit Specialists MS8040 true RMS multi-meter
  • B&K 290 electronic analog multi-meter
  • APC H10 AC line power conditioner
Bench Testing
All six phonograph preamps were bench checked with my typical set up of equipment. My results may or may not agree with results by other individuals, but are consistent among themselves. A long standing issue in my workshop is a relatively high level of electronic noise. All my equipment is fitted into a fairly small area and a lot of it generates noise. The noise floor in the shop is typically -91 to -95 dBv. This necessarily limits my ability to test really quiet equipment. This was the case with two of the preamps. On the day of the tests the noise floor was -91 dBv. The Moon LP3 measured -91 dBv and the Groove at - 89.9. All those results can tell me is that both units are very quiet. The specification for the Moon is -106 dBv and the Groove has been previously measured consistently right at the noise floor (-90 to -91). The remaining 4 preamps did measure within the capability of my equipment. They ranged from as low as -81 dBv to a high of -84 dBv (more negative is better).

The gain of the preamps ranged from a low of 34 dBv (DH101) to 44.2 dBv (Groove). The remaining 4 units were all clustered around 40 dBv. Initially the K303 was about 2 dB lower than all the others (at an estimated 32 dB) and I made the kit indicated modification for additional gain. In my opinion the original gain would be insufficient for many systems especially those using passive preamps.

For signal to noise level I used a combination of the noise floor and the gain. It might be better called effective difference between the level of output and the noise floor for a given input signal. That way it would provide an indication of how quiet a preamp would seem in any particular system. The more output you have from a preamp the less follow on gain you will need to use for a comfortable listening level. Then turning down of the system gain will apparently lower the noise floor of the entire system. The opposite is equally valid. An apparently excellent noise floor could be offset by low gain with the result being an apparent higher overall noise level in the final sound level from the system. The results here favored the Groove with its higher gain; however the Moon would probably be better if the actual noise level could have been measured. Both are extremely quiet in use. The remaining units were within a 5 dB span with the DH101 with the lowest apparent signal to noise ratio. None however exhibited sufficient noise to detract from the listening experience.

Distortion levels were measured at 1000 Hertz at the 1 volt RMS level into a 10k-ohms resistive load. Capacitance was minimal at approximately 100pF due primarily to the short cables used in the test set up. Deviating from my usual procedures, I used a battery powered signal generator. This eliminated a number of possible noise sources that would be considered by my distortion analyzer as distortion. For it anything that is not the fundamental is considered distortion. The penalty in doing this is that the residual distortion in the generator was 0.44%. However, since all preamps were tested the same the results while not definitive do provide a comparison. It should be noted that doing a complete test of the distortion levels and subsequent matching to the RIAA standard is a very time consuming process and was not the focus of this comparison. The actual distortion levels ranged from 0.65% for the Moon to 2.3% for the Jaycar. As noted in the listening tests there were no specific instances of audible distortion, but rather some less than stellar performances. Of particular note were issues with the TC750. In testing it was discovered that it had a very low output capability. It was unable to deliver over 1.75 volts RMS at low to mid frequencies and above approximately 10 kHz it could not deliver over 0.5 volts RMS without visible distortion of the wave form. All other preamps were able to deliver over 5 volts output at any frequency easily.

To determine basic compliance with the RIAA standard, I used 5 separate frequencies. All preamps were tested at the one volt output level except the TC750 that was unable to deliver that level and it was tested at the 0.5 volt level. The chosen frequencies were picked as they are the ones where the worst performance could be expected. This is at the upper and lower extremes of the audio band in comparison to the 1000 Hertz reference. My experience has been that nearly any phono preamp can come reasonably close to the standard between the limits of 100 Hertz and 10,000 Hertz. There is some disparity in what various manufacturers do at frequencies below 50 Hertz and above 15,000 Hertz. Some either flatten the curves there or in some cases actually intentionally reduce response there. The thinking behind this is most likely that there is little musical content there and there are possible benefits to the signal to noise and cancellation of rumble and low frequency resonances. In my opinion, the preamplifier should reproduce whatever signal it is fed and problems with noise should be handled at the source. As noted in earlier paragraphs, the measurements I made might or might not be the same as someone else would get, but all units were tested the same and the results allow for some comparisons. There really was no perfect fit. However the Groove, Jaycar and (surprise) TC750 were closest. The Moon was excellent on the high end, but for some reason demonstrated a reduction at 50 Hertz (only a dB) and a rapid reduction in response at 20 Hertz (3 dB). The K303 was significantly off at 50 and 20 Hertz and I can speculate it was because of its high sensitivity to the load. This was evident when a quick check of each preamp was done with a 5 k-ohm load in place of the standard 10k one. The only preamp that demonstrated a significant drop in output was the K303. The reduction was approximately 3 dB at mid band. This factor may limit its application to only systems with relatively high input impedance (the test system was approximately 50 k-ohms).
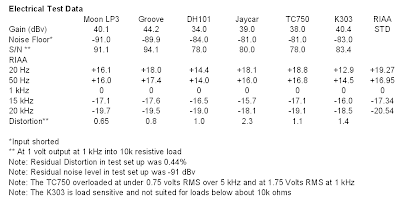
Electrical Test Data (click to enlarge)
Summary and Conclusions
Since the comparison was largely subjective with some bench testing used to verify or at least establish some relationships between the preamps, the conclusions necessarily are also subjective. None of the three “budget” preamps should be considered anything but entry level devices. The TC750 is at best a marginal one even in that group. The K303 and Jaycar are fairly well matched, but have slightly different sonic signatures. In modest and undemanding systems they would probably be adequate. I would not use the K303 without the modification for higher gain. The notation in its instructions that the extra gain would allow it to be used with low output moving coil cartridges is suspect. With the extra gain it was right in the middle of the group for moving magnet / moving iron cartridges. I would also not use it systems in which the following equipment had an impedance lower than 10K ohms and preferably with ones above 50K. The DH101 was a surprisingly good performer considering it was included primarily as a comparison of older technology, granted one with some exceptional design features. It would have fared better with more gain, but since it is actually part of a complete preamplifier it is entirely likely that the shortage in gain was compensated for in later stages. The remaining two preamps are both excellent and quite different in many respects. Both are extremely quiet. They have low distortion and with the exception of the curious bass reduction in the Moon, match the RIAA curves well. They both sound excellent, but different. The Moon is articulate and the Groove robust. Each is a product of its technology. The Moon is all solid state IC based. The Groove is an all valve design. The end choice is likely to be whether you prefer solid state sound or valve sound. I will not argue for either case as both are valid at the personal level. My personal preference is for the sound of the Groove, but I could, and have listened happily to the Moon for nearly a year while designing and perfecting the Groove.

Good listening,
Bruce Heran

02 November 2011

Groovewatt Tube RIAA Phono Preamp

The latest project from Bruce's workbench is the Groovewatt, a tube based RIAA phono preamplifier.  The Groovewatt is the result of over one year of work and several build iterations.  Bruce set some pretty high performance requirements for the tube preamp and he is very pleased with the results. 

Second Groovewatt Build 
The Groovewatt uses a symmetrical SRPP (12AX7) input stage which feeds a passive RIAA equalization network. The second gain stage is nearly identical to the input stage and is direct coupled to the third stage which is a cathode follower (12AT7).  Bruce used Gold Pin JJ ECC83S for the SRPP stages and half of a ECC81 for each side of the cathode follower.  The power supply is solid state and DC is used for the tube heaters.  Total gain of the RIAA phono preamp is about 45 dB which should be sufficient for use with a high output MC cartridge.

Inside View - Third Groovewatt Build
Third Groovewatt Build
The measured performance of the Grovewatt is excellent and noted in the project page.  Bruce reports excellent results with the Groovewatt in place in his system.  For the full details of the Groovewatt, see the DIY Vacuum Tube (Valve) RIAA Phono Preamp project page.

 
More Hi-Fi Vacuum Tube Projects by Bruce

11 July 2011

Boozhound Labs JFET RIAA Phono Preamp Kit Review

After building a few diy versions of the Boozhound Labs / Le Pacific JFET RIAA phono preamps,  Mark decided to try the actual $79US Boozhound Laboratories (BHL) JFET RIAA phono preamplifier kit. In Mark's diy versions of the phono preamp he used polypropylene capacitors.

DIY JFET Phono Preamp on Stripboard
On the other hand, the BHL phono preamp kit comes with fabulous looking vintage new old stock (NOS) Russian military paper-in-oil (PIO) capacitors. PIO capacitors made in this fashion are quite respected and sought after for their sonic qualities.  The BHL phono preamp kit comes with a PCB, the circuit parts and detailed building instructions. The kit builder will need to supply a 24VDC power supply (linear, regulated or battery will work), a chassis to house the preamp and various miscellaneous hardware items like connectors and switches.

Finished JFET Phono Preamplifier Kit PCB with PIO Capacitors
For his kit build, Mark used AA cell batteries for a noise free power supply and he housed the preamplifier circuit and battery power supply in the 19-inch 1U chassis shown below.

Inside View - JFET Phono Preamp
Mark reports that this is his best phono preamplifier build so far.  For full details about this project, see Mark's review of the Boozhound Laboratories JFET RIAA phono preamplifier kit.

More Phono Projects

23 August 2010

ECC802S (12AU7 / ECC82) Tube SRPP Preamp


Our friend Bruce has shared another one of his vacuum tube projects with the DIY community.  His latest project is the ForeWatt Tube Preamplifier which is an ECC802S (12AU7 / ECC82) tube preamplifier.  The tube preamp uses a SRPP topology with ECC802S tube that can be substituted with 12AU7 and ECC82 tubes.  The gain of the preamp can be set 7 (~17dB) or 11 (~21 dB).  The lower gain setting is realized when the cathode bypass capacitor is omitted.  Naturally a switch can be used to change gain if desired.  Shown in the photo below is the Type I preamplifier build which uses a manual rotary switch for input selection and a manual Alps Blue Velvet potentiometer to attenuate the input signal.  The fabulous wooden enclosure was built by fellow hobbyist Jeff.

DIY ECC802S (12AU7 / ECC82) Vacuum Tube SRPP Preamplifier

The power supply is solid state and the DC is used to heat the tubes.  In the Type II version of the preamplifier shown in the photo below a remote control module is used for signal selection and signal attenuation.  With the remote control module the preamplifier can also be used as a passive (no gain) preamplifier.

DIY ECC802S (12AU7 / ECC82) Vacuum Tube SRPP Preamplifier

Bruce reports that with the ForeWatt preamplifier there is very clean with plenty of detail, a wide soundstage and that typical warm lush tube sound.  The measure performance of the preamp is very good.

For full details about the ForeWatt Preamp, see the DIY ECC802S (12AU7 / ECC82) Tube SRPP Preamplifier project page.

More Tube Preamplifier Projects:

02 May 2010

DIY Tube RIAA Phono Preamplifier Kit

Last year Mark built a number of the Oatley Electronics K272 tube headphone amp kits and he has recently got his hands on the new Oatley Electronics K282 Tube Based Stereo RIAA Preamplifier Kits.  The kit is for moving magnet (MM) cartridges.  The inexpensive kit costs $47AU (about $44US, $44CDN, $33EU, 29GBP) and includes a power supply.

 
Like the headphone amplifier kit, the phono preamp kit is based around new old stock (NOS) Raytheon JAN 6418 sub-miniature pentode tubes.  The circuit is a tube hybrid with FET stages and a SMPS.


The kit is built on a through-hole PCB and also includes a "universal" 5V power supply that will operate pretty much everywhere.  You will have to provide your own audio connections (RCA jacks) and an enclosure.  As Mark notes, for best performance you will need to pay special attention to controlling vibration and mechanical noises as the sub-miniature tubes are extremely microphonic.


    Mark reports that the inexpensive kit is a good performer.  With the low cost of the kit, this is a great low voltage kit for those interested in tube or phono audio.  Read about Mark's experience with the phono preamp kit and his tips for reducing tube microphonics in the diy 6418 tube RIAA phono preamplifier kit review (Oatley Electronics K282). 

    More Phono Projects

    24 August 2009

    6418 Sub-miniature Tube Preamp / Headphone Amp

    We often get questions asking about suitable vacuum tube (valve) kits for beginners or first time DIYers. Aside from the fact that vacuum tube audio kits are generally expensive, there is also the safety concern that most tube circuits operate with potentially lethal voltages. Mark in Australia found the following 6418 tube preamplifier and headphone amp kit which is an exception - it is inexpensive and can operate from single 9V battery.

    6418 sub-mini Tube Preamp / Head Amp Kit
    The tube preamp / headamp kit is from Oatley Electronics in New South Wales Australia and based around the Raytheon JAN6418 sub-miniature valve (tube) and an IC. The K272 Stereo Tube Preamplifier – Headphone Driver kit cost $27AU (~$23US – August 2009). The kit is complete including a printed circuit board (PCB) which makes for easy assembly but you will need to provide your own enclosure. The kit only consumes about 12mA at 9V and can be powered with a single 9V battery making this a safe and ideal kit for those who are new to vacuum tube electronics.

    6418 Tube Preamp / Headphone Amp Kit

    The photo above is a build of the kit using the supplied parts. Since the 6418 tube are extremely microphonic and will "ring" if they are subjected to vibrations rubber grommets are used to help damp the tubes. Mark has built a number of these kits now including a few with upgraded parts (metal film resistors, polypropylene film inter-stage capacitors and a Burr-Brown OPA2134 op-amp). The photo below is a tube preamp in a plastic ABS enclosure using the kit and upgraded components.

    6418 Tube Preamplifier Kit
    Mark reports that the kit performs well and sounds good. The bandwidth is very wide, the -3dB points are 10Hz and 50kHz. As a preamp there is good depth, wide breadth and sharp detail revealing fine recorded detail with no hard edges. The photo below shows the kit in a plastic enclosure being used as a portable headphone amplifier.

    6418 Tube Headphone Amplifier Kit

    The tube preamp / headamp kit from Oatley Electronics is well worth the $27AU price tag. For complete project details and more variations see the project page for the 6418 Tube (valve) Preamplifier / Headphone Amp Kit.

    Additional Tube Headphone Amplifier Projects:


    What's Playing
    : Roy Orbison - Shahdaroba

    30 November 2008

    Moving Magnet Phono Preamp Kit

    Mark in Australia has put together a moving magnet phono preamplifier using a electronics hobby kit. The phono preamp kit provides everything you need except minus an enclosure and a power supply (AC walwart). The circuitry is contained on a printed circuit board (PCB) and consists of operational amplifiers (opamps) with up to three equalization compensation circuits which can be selected with jumpers or a switch. The kit comes with LM833, but you can use which ever opamp you prefer. The power supply is also on the PCB and uses 7812 / 7912 regulators. The design supports all of the common compensations and several 78 compensations as well.

    Phono Preamp Kit
    The enclosure and power source need to be provided. For the power supply Mark used a walwart (15VAC) and the circuitry is contained in a plastic (ABS) enclosure. The inputs/output were moved to the rear.

    Moving Magnet Phono Preamp Kit Enclosure

    Mark reports that the kit is dead quiet, performs well and can hold it's own against the popular Pro-Ject Phono Box SE preamp. See the project page: DIY MM Phono Preamplifier Kit (Moving Magnet) for full details.

    More DIY Phono Projects

    24 November 2008

    DIY 12AU7 Tube Preamplifier

    This is Alan's mini-tube preamplifier.

    12AU7 Tube Preamplifier Project
    It is a very simple tube preamplifier project that will work with the 12AX7 or 12AU7 vacuum tubes, both of which are fairly common. The preamp is built using primarily parts that Alan had on hand. To make a real frugal build, the preamp can be built using 12V transformers and placed back-to-back in order to get the required high voltage and for the heater supply. Total costs for this project ran Alan about $30, with the majority of those costs going towards the enclosures and RCA jacks.

    DIY 12AU7 Tube Preamp and Power Supply
    The power supply is housed in a separate enclosure, also from Hammond. For full information, see the project page: DIY 12AU7 / 12AU7 Tube Preamplifier.

    Related Tube Preamplifier Projects:

    What's Playing:
    Ingrid Michaelson - The Way I Am


    31 March 2008

    DIY OP Amp Based Preamplifier

    INTRODUCTION
    After building a OPA2134AP CMoy / Grado RA1 headphone amplifier in a timbre box, I wanted to try this high performance OP amp in a line stage / preamp. Rod Elliott's High Quality Audio Preamp (Mk II) which is a two stage preamp with balance control seemed like a good choice.

    DIY PREAMP AND POWER SUPPLY

    Two small pc proto boards (Radio Shack 276-159 / Dick Smith H5601) were used to accommodate all components. Metal film polypropylene capacitors were used in the signal path. It would have made the whole project easier by using physically smaller caps but for me the sound was a priority. For the power supply I used a 1.2A 18V regulated SMPS wall wart. I definitely do not need 1.2A, but I wanted a gutsy supply. Two 1k 0.5W resistors make up the "virtual ground" split supply. 220 uF low ESR capacitors and 0.1 uF decoupling capacitors are used for channel. This simple supply configuration works very well and is dead quiet.

    DIY OPA2134AP Linestage Preamp PCB
    PREAMP ENCLOSURE
    The case only measures 115 X 90 X 55 mm (same size enclosure that I used for my Nanoo LM3875 Gainclone) and placing all the components in this tiny space, including a dual gang volume control and balance control was going to be tough. Unless you enjoy working in ridiculously small spaces and/or you are masochistic, build this preamp in a bigger case. Even a slightly bigger enclosure would be better. For the finish I use an acid etch primer, allowed a few days drying and then the spray color over the top. This was the same technique used with the big red caps on the Synergy Roasting Pan LM3875 Chip Amp / Gainclone.


    DIY OPA2134AP Linestage Enclosure Front
    DIY OPA2134AP Linestage Enclosure Back
    RESULTS

    I have used the preamp as a front end to my S-5 Electronics K-12 Tube Amplifier. The test setup comprised a NAD C542, modified bookshelf speakers and DIY Silver Interconnect Cables
    . The preamp added nothing and took away any CD player/ Valve power amp miss-match. For that reason I have named it Neutrino. The balance control has a very wide sweet spot and the volume control was non-twitchy, linear and easy to use. A very inexpensive project but it feels odd to build something that adds and removes NOTHING audibly in a cute box. Try it.

    Mark Houston


    Other DIY Audio Projects by Mark:

    01 May 2007

    "Beauty" - A 12AX7 Tube Preamplifier

    To accompany his recent LM3875 DIY Chip Amplifier (gainclone) project, Bruce has put together a DIY 12AX7 Tube Preamplifier Kit to drive the chip amp. He has named the tube preamp "Beauty", as it sweetened the sound of his LM3875 Chip Amplifier.

    12AX7 Tube Preamplifier Kit
    For the enclosure, Bruce used a readily available plastic and aluminum project box from Radio Shack. This is the same enclosure he used for the LM3875 Chip Amp. The photograph below shows the Tube Preamp and Chip amp together.

    12AX7 Tube Preamp and LM3875 Chipamp
    Similar to what Mark discovered with this economical (read dirt cheap) tube preamplifier kit is that you get a very quiet preamp that can compete with ones that cost much more. For more information about this project, see Bruce's project page, "Beauty" - A DIY 12AX7 Tube Preamplifier Kit.

    Related Post:

    What's Playing:
    The Cars - Bye Bye Love (Demo)

    01 March 2007

    DIY 5687 Tube Preamplifier

    The latest addition to the DIY Audio Projects website is a fine looking tube preamplifier constructed by Vincent Wong. The tube preamp is based around a pair of 5687 twin triodes. Each channel uses both sections of a 5687 tube and LED biasing is used on each section.

    DIY 5687 Tube Preamplifier Project
    To keep hum at a minimum, the filaments are heated using DC. The power supply is external to the preamp section and consists of a RCA-83 mercury rectifier and two 50H chokes.

    DIY 5687 Tube Preamp Project
    For more project details including schematics and an enclosure construction guide, see: DIY 5687 LED Biased Tube Preamplifier.

    Related Tube Preamplifier Projects:

    What's Playing: Fleetwood Mac - Landslide

    12 February 2007

    12AX7 Tube Preamplifier Kit

    12AX7 Tube Preamplifier Kit
    This is Mark's build of a simple and inexpensive 12AX7 tube preamplifier kit from Silicon Chip magazine. What makes this kit inexpensive (and interesting) is that power comes a switch mode power supply, which is fed from a 17 volt DC wall wart! To silence the skeptics of a switch mode power supply in a tube circuit, Mark has completed a number of measurements on the power supply as well as the preamp. Mark's modifications to the preamp kit include the addition of snubbers and upgraded capacitors. The end result is a simple DIY tube preamplifier that sounds great and will keep some money in your pocket for your next DIY Audio project.

    12AX7 Tube Preamp and NAD C542 CD PlayerFor more detailed information about Mark's latest project, see the project page, a DIY 12AX7 Tube Preamp kit.

    Related Posts:

    What's Playing: Pearl Jam - Glorified G