25 September 2008

Swans Tempus Bookshelf Speakers

Daniel Bolduc (from Canada) sent us an email informing us that he has finished a another set of DIY Speakers. His latest project is two sets of Swans Tempus Bookshelf Speakers by HiVi Research. The Swans Tempus speakers were featured in the German sound magazine KLANG+TON in their June 2002 issue which commended the excellent acoustic response of this bookshelf speaker.

HiVi Research offers the Swans Tempus speakers as a kit, but in true do-it-yourself (DIY) fashion, Daniel sourced the parts himself and built the bookshelf enclosure. The Swans Tempus bookshelf speaker uses the HiVi Research F6 Mid-woofer which features a Kevlar/paper curvilinear cone, phasing plug, and alloy basket. The tweeter is the HiVi Research TN28 which is a silk dome tweeter in an open-air housing. The photo below shows Daniel's finished speakers.

DIY Swans Tempus Bookshelf Speakers
Technical information, enclosure dimensions and measurements of the
Swans Tempus Bookshelf Speakers is available from the manufactures website. The bookshelf speaker enclosure plan and crossover are shown below (click to enlarge).

Swans Tempus Bookshelf Speaker Enclosure and Crossover Plan
For the speaker enclosure Daniel used 1" thick laminated maple. The finish on the cabinets is four coats of transparent spray lacquer. The photo below shows a rear view of the finished bookshelf speakers (click to enlarge the photograph).
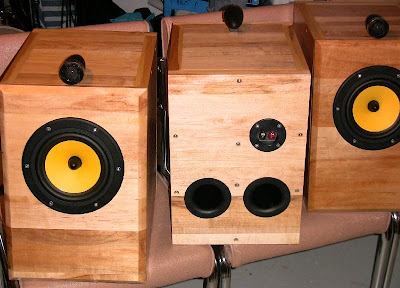
DIY HiVi Research Swans Tempus Bookshelf Speakers
Daniel had the following comments about the Swans Tempus Bookshelf Speakers

"After about 80 hours working on the project, the Tempus speakers are finally done and I can assure you that they are sounding great. Bass frequencies are deep and clean while the highs are well balanced. But, due to either the limitation of the TN28 to 20 kHz or the crossover network, high frequencies are not as well defined and crisp as on the 1.618 speakers I built few months ago."
"Even with this little lack of highs, I'm very satisfied of the sounding of these speakers and the pair that is hooked on my computer performs much better than all computer speakers systems I've ever heard (I didn't hear a lot of systems but you have to start somewhere!)."

The 1.618 speakers that Daniel is comparing the Swans Tempus speakers are a DIY speaker design by Adam McCall - 1.618 - 3-Way Hi-Vi Tower Speaker Project.

Daniel has put together a detailed build log of the Swans Tempus speakers on his site with plenty of photographs.

More DIY Bookshelf Speaker Projects:

22 September 2008

DIY Jordan JX92S Open Baffle Speaker

Martin J. King of Quarter Wavelength Loudspeaker Design has added a new DIY open baffle loudspeaker project to his site. Martin's loudspeaker project uses a Jordan JX92S full range driver mounted on an open baffle in conjunction with a Goldwood GW-1858 woofer which is mounted in an H-frame. The picture below (click to enlarge) shows the new open baffle speaker design set up next to his Lowther DX3 ML-TL speakers.

DIY Open Baffle (OB) Jordan JX92S Speaker
As you can see, the enclosure is fairly simple and relatively compact (for open baffle speaker systems). The two-way dipole speaker systems covers most of the 20 Hz to 20 kHz frequency range. The H-frame configuration is used for the bass below 200 Hz and the small Jordan full range driver are for the frequency range from 200 Hz to 20 kHz.

As with all of Martin's loudspeaker projects, his latest is also very well documented and very informative. For full details about this loudspeaker project, see Martin's writeup: Jordan JX92S Open Baffle and Goldwood GW-1858 H Frame Two Way Speaker System - (PDF 1.68MB).


Related Jordan JX92S DIY Loudspeaker Projects:

What's Playing: Kate Bush -King of the Mountain

04 September 2008

Ultra-Linear 6T9 DIY Tube Amplifier

It was always my intention to build two 6T9 vacuum tube amplifiers. For the first one I used a baking pan for the chassis and I was interested to hear just how good these simple single-ended (SE) tube amps could be with just basic components. From the first hour of play I was very impressed with just how musical they are when matched with the right speakers. My second build of this amplifier incorporated a lot of the original parts but this time more attention was paid to the construction and small upgrades to capacitors and the power supply. I also found that the sound could be further improved by converting the kit to operate from Pentode mode to Ultra-Linear (UL) mode. Both amplifiers are Class A.

The schematic below shows the tube amplifier circuit (click to enlarge). The items in red are the changes that are required for the conversion to UL mode.

6T9 Ultra-Linear Tube Amp Schematic
To change the output section to UL the screen grid resistor (R107, 1k) was removed and the UL tap (tap 3) from the Edcor audio output transformer (OT) is wired directly to the screen grid (pin 10). Other changes I made to the amplifier circuit were to replace the input capacitor C101 (and C201) and the coupling capacitor C102 (and C202) with 0.22 uF metalized polypropylene types. This helps improve the bass response slightly.

The power supply schematic is shown below (click to enlarge). On the power supply I made the following changes which are shown in blue on the schematic. 0.01 uF polyester capacitors across the rectifier diodes. 0.1 uF polypropylene capacitors across all the electrolytic capacitors. One additional 100 uF electrolytic capacitor in the power supply.

6T9 Tube Amp Power Supply Schematic
6T9 Tube Amplifier Edcor Transformers
Tube Amp Construction Notes
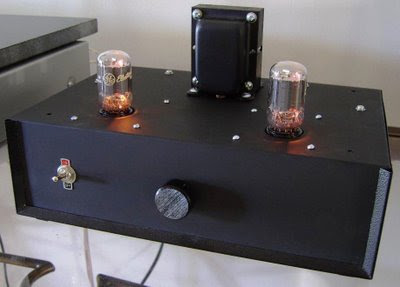
I wanted the amp to look cool (very black) and minimalist with its gold connections hidden and all hardware neatly tucked under a black enclosure. Two coats of Epoxy Enamel spray paint was used on the case once all drilling had been completed.


DIY 6T9 Valve Amplifier Kit
The amp is designed to deliver music well, to be unassuming in appearance and have a high wife acceptance factor (WAF). The OTs are slung under the top plate where the power transformer is mounted. Once again the power transformer and the OTs are rubber mounted. Multi-core shielded cable is used to connect the rear gold insulated RCA connectors to the 50k potentiometer and to the printed circuit board (PCB). The power switch was conveniently placed at the front of the amp and a captive power cord was used.

The potentiometer should be connected to the signal ground. Also keep the chassis earth and signal earth separate. Use the shielding on the input wiring to distribute the earth to the input RCA connections, potentiometer and PCB.

DIY 6T9 Vacuum Tube Amplifier Kit
6T9 Tube Amp Measurements

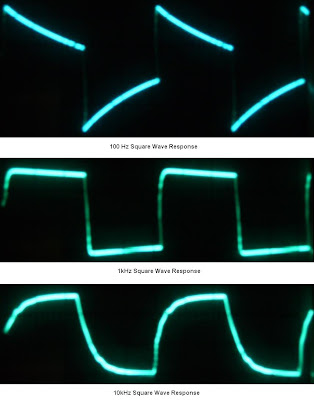
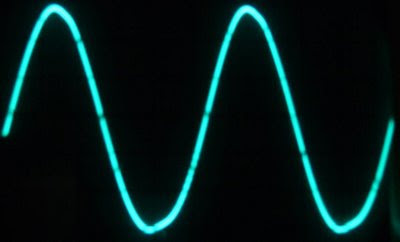
The photographs below show the sine and square wave response of the amplifier. There is little to no change in the response compared to pentode operation.

6T9 Tube Amp Square Wave Response

6T9 Tube Amp Sine Wave Response
Sine Wave Response - 1kHz @ 6.2V P-P, 8-ohm load

6T9 Tube Amp Sound
I played the new amp without NFB and with to determine the best sound. I found the amp sounded much better with NFB. The UL version of the 6T9 tube amplifier sounds better than the Pentode version. Because so many of the components are the same in both amps the improvement in sound is likely due to the UL operation mode.

Mark Houston


Additional 6T9 Tube Amplifier Links